LoadLog user guide
Everything you need to set up LoadLog, record your first waste transfer note, pull the reports you need for compliance, and keep your carrier records in order.
Prefer to watch? See the full walkthrough video.
1. Getting set up
Set up takes a few minutes. Work through these steps once and LoadLog is ready for daily use.
1.1 Create your account
Go to the sign-up page and enter your email address and a password. You do not need a card to start.
Pick the plan that fits your site. The Free plan covers five waste transfer notes a month, which is enough to try everything before you commit. Compliance Lite, Compliance Plus and Enterprise add more users and features. You can change your plan at any time from Settings, then Billing.
1.2 Organisation settings
Open Settings, then Organisation. Fill in the details that will appear on your records.
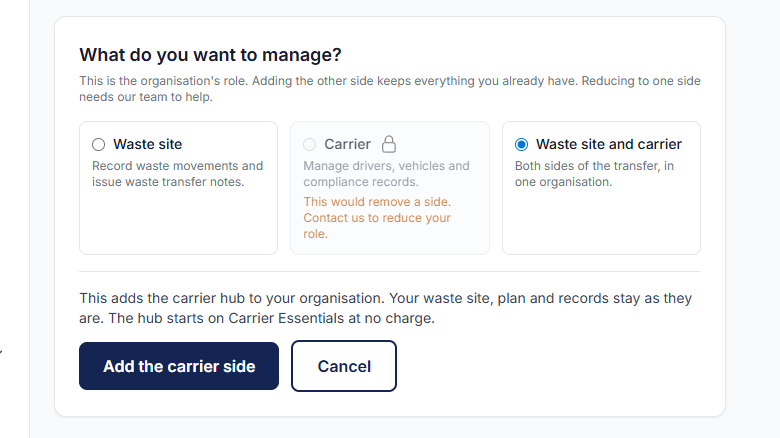
At the top of the page, What do you want to manage? sets which side of the business the account covers: Waste site, Carrier, or Waste site and carrier. The choice filters which cards appear. A waste site can add the carrier side later, and the site, plan and records are untouched. Section 3 covers the carrier side.
| Field | Notes |
|---|---|
| Organisation name * | The name of your site or business. |
| Address | Line 1, line 2, city and postcode. |
| Contact email * | The address LoadLog uses for account messages. |
| Contact phone | Optional. |
| Use alternate details for billing | Optional. Tick this when invoices need a different address or email. Only invoices change; everything else keeps your standard details. |
| Billing address | Optional. Printed on invoices instead of the address above. Fill in line 1, town and postcode, or leave all of it blank. |
| Billing email | Optional. Invoices are emailed here instead of your contact email. |
| Permit number * | Your site's environmental permit number, also called its authorisation number. Common formats: EPR/AB1234CD (England), AB1234CD (Wales), PPC/A/1234567 (Scotland), P1234/56A (Northern Ireland). Enter it exactly as it appears on your permit or licence, keeping the slashes. This is not your carrier registration or your DEFRA API code. Read the permit number guide. |
| Default carrier registration | Optional. When set, this pre-fills the carrier field on new notes. On the note form, choosing a carrier from the lookup fills in the carrier details for you. |
Click Save Changes when you are done.
If you run more than one site, each site's address and permit number live on the Sites screen instead. See section 1.6.

1.3 Connect to DEFRA
LoadLog links directly to DEFRA's Digital Waste Tracking Service. In the Organisation screen, scroll to DEFRA Integration. The sandbox code is already in place; you add your own production code.
Add your production code
Your Sandbox API Code comes filled in and locked. It is the test code for the sandbox, and there is nothing to change in that box. Add your Production API Code, which is the code DEFRA issued to your own organisation when your registration was approved. Each code is a UUID and looks something like 1f83215e-4b90-4785-9ab2-2614839aa2e9.
Verify your production code
Click Verify Production Code. LoadLog checks the code is in the right format and saves it, ready for use. Your first sandbox submission is the real test that the link is working.
Choose your environment
Use the Environment toggle to work in the sandbox while you test. Switch to Production when you are ready to submit real loads.
If you have not registered with DEFRA's Digital Waste Tracking Service yet, LoadLog points you to the GOV.UK registration form during setup. Test everything in DEFRA's sandbox before you switch to production.
1.4 Audit log retention
In the same screen, choose how long to keep your audit log. You can keep it for 6, 12, 18 or 24 months.
1.5 Add your team
Open Settings, then Team, and click Invite User.
Enter their email address
Use the address they will sign in with.
Choose a role
There are three roles. Admin users can change settings and manage the team. Operator users can record and sign waste transfer notes. Viewer users have read-only access.
Send the invite
They get an email to finish setting up their account. You can see every user, their role and their status in the Team table.
The number of users you can add depends on your plan. If you hit the limit, LoadLog will point you to Upgrade plan.

1.6 Sites
If your organisation runs from more than one site, you can register each one in LoadLog. Admin users manage sites on the Sites screen, under Settings. Each site keeps its own address and environmental permit number, so every note and report carries the right site's details. You can archive a site you no longer use: archived sites do not count towards your plan's limit.
How many sites you can add depends on your plan. Compliance Plus includes up to five sites, and Enterprise has no limit.
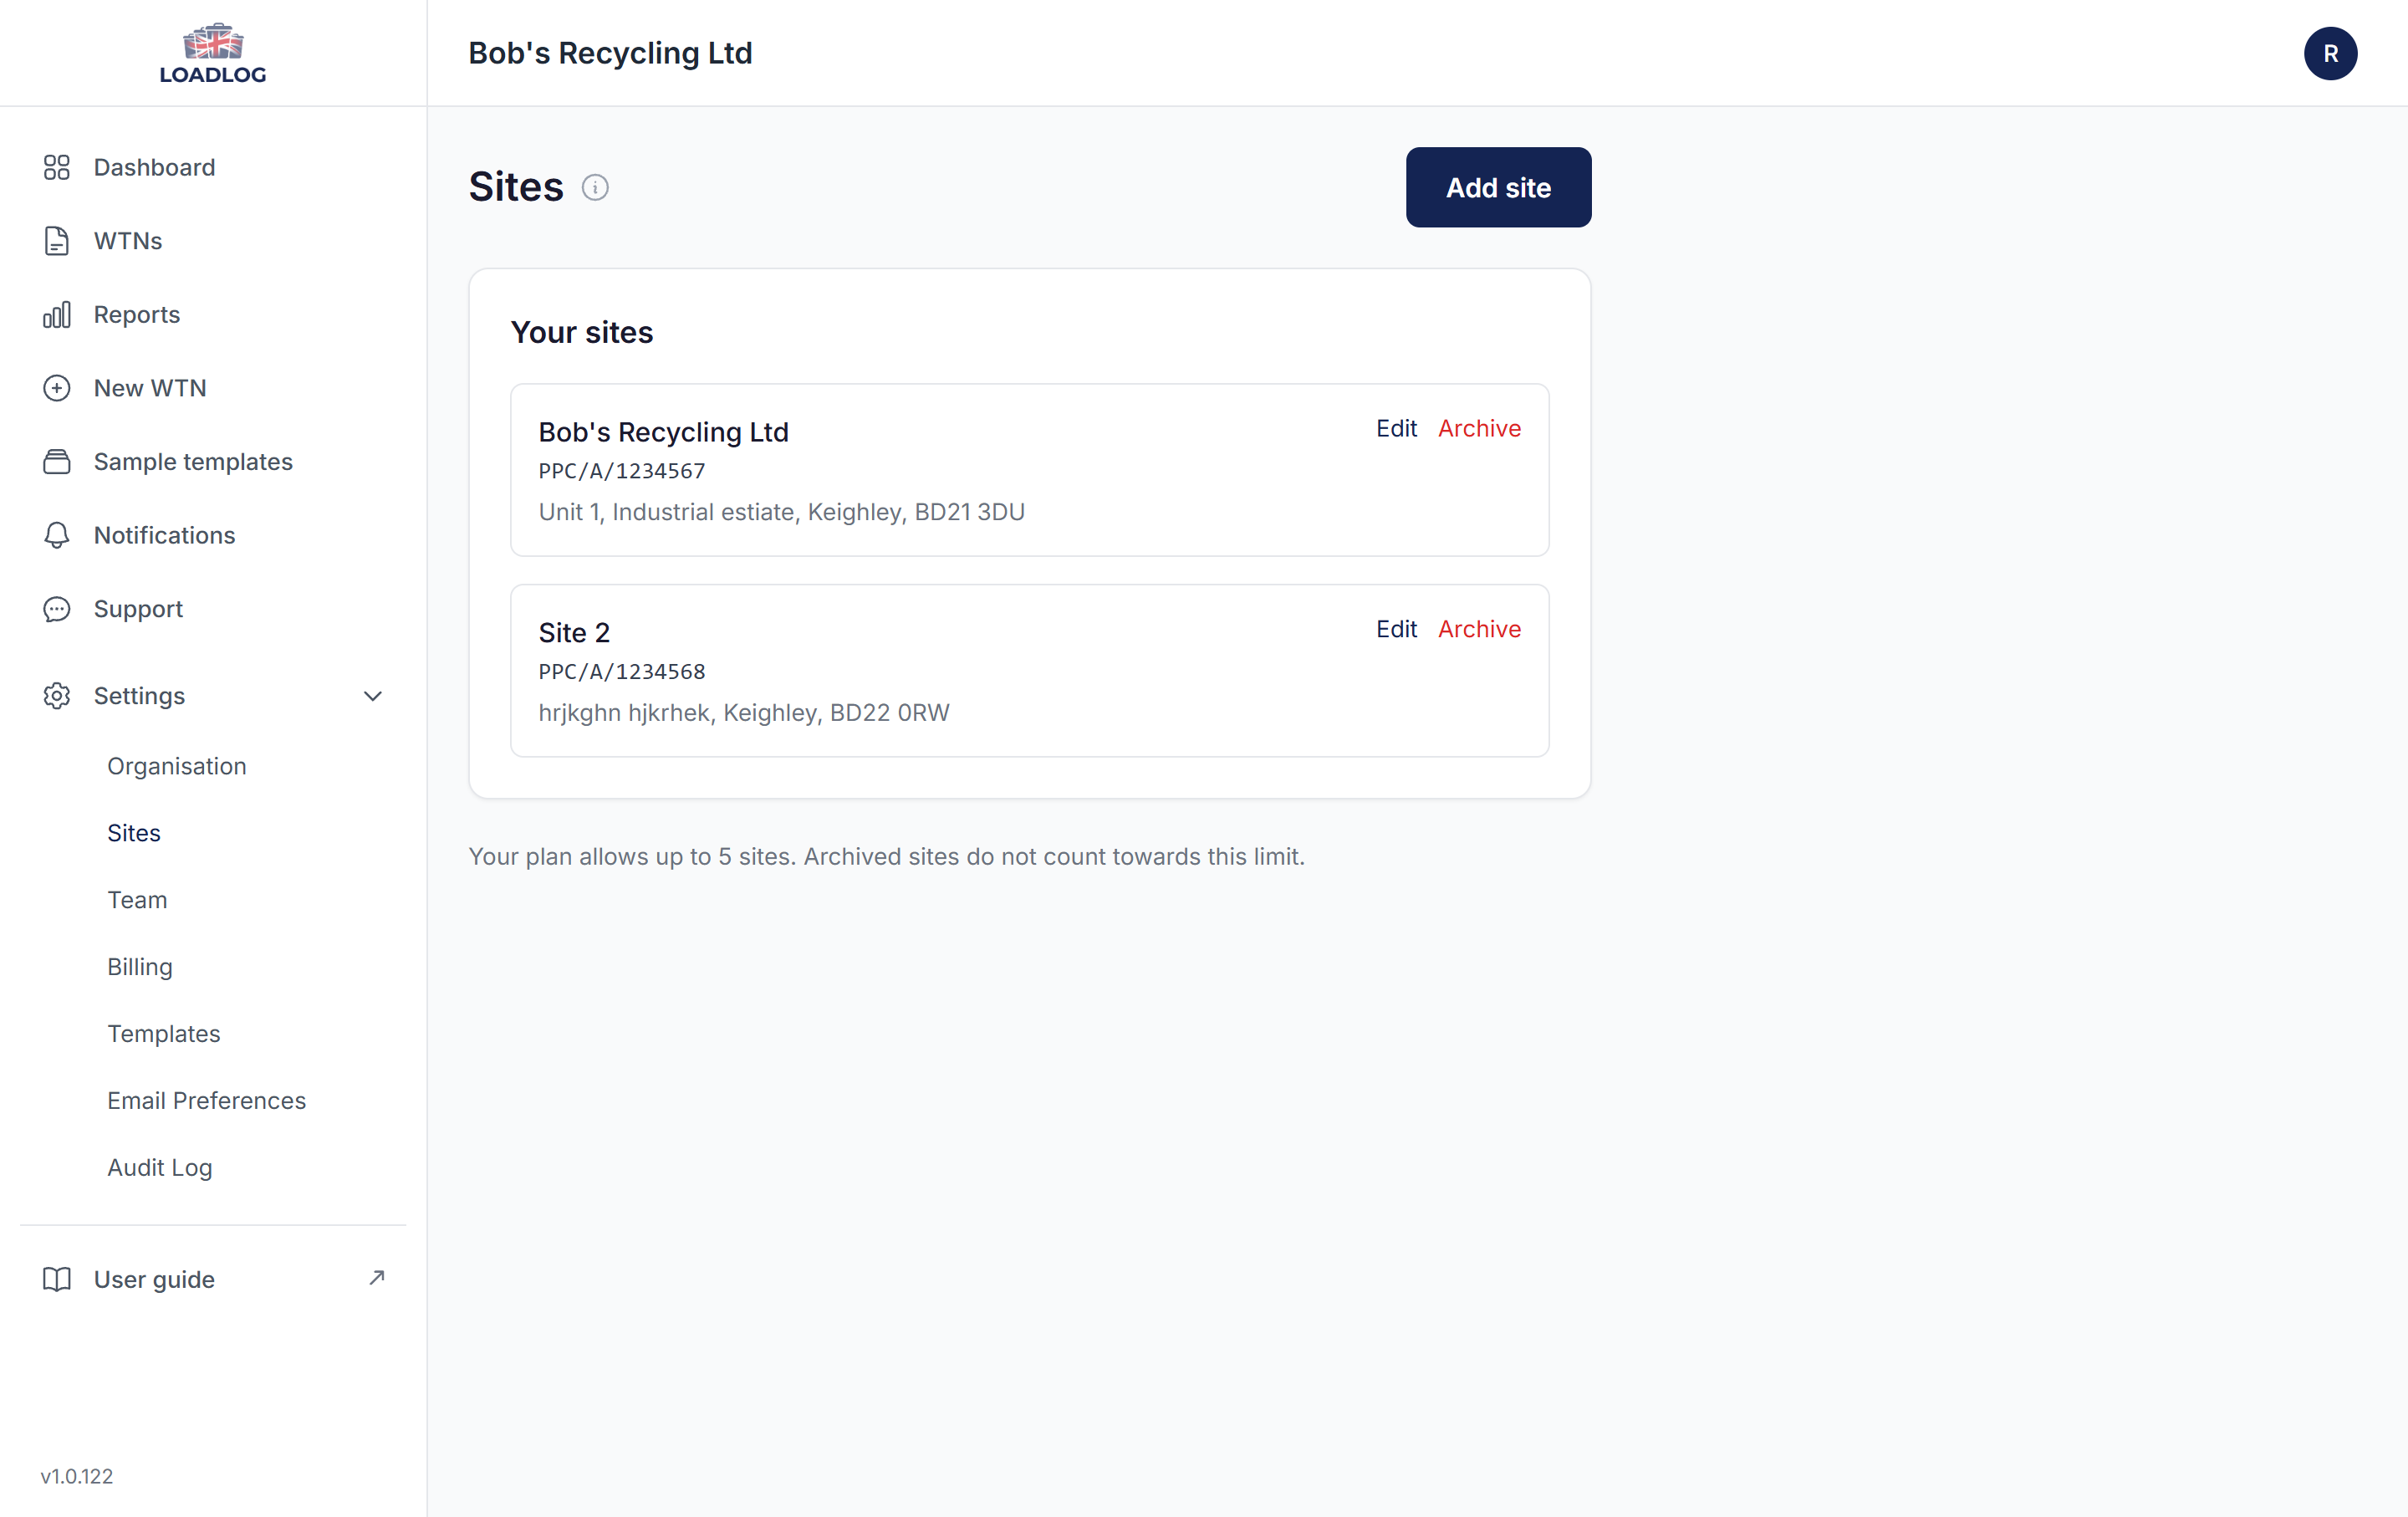
When you create a waste transfer note, choose the receiving site from the Site drop-down at the top of the form. The site's name, permit number and address are sent to DEFRA as the receiver and printed on the PDF. LoadLog remembers the last site you used and selects it for your next note.
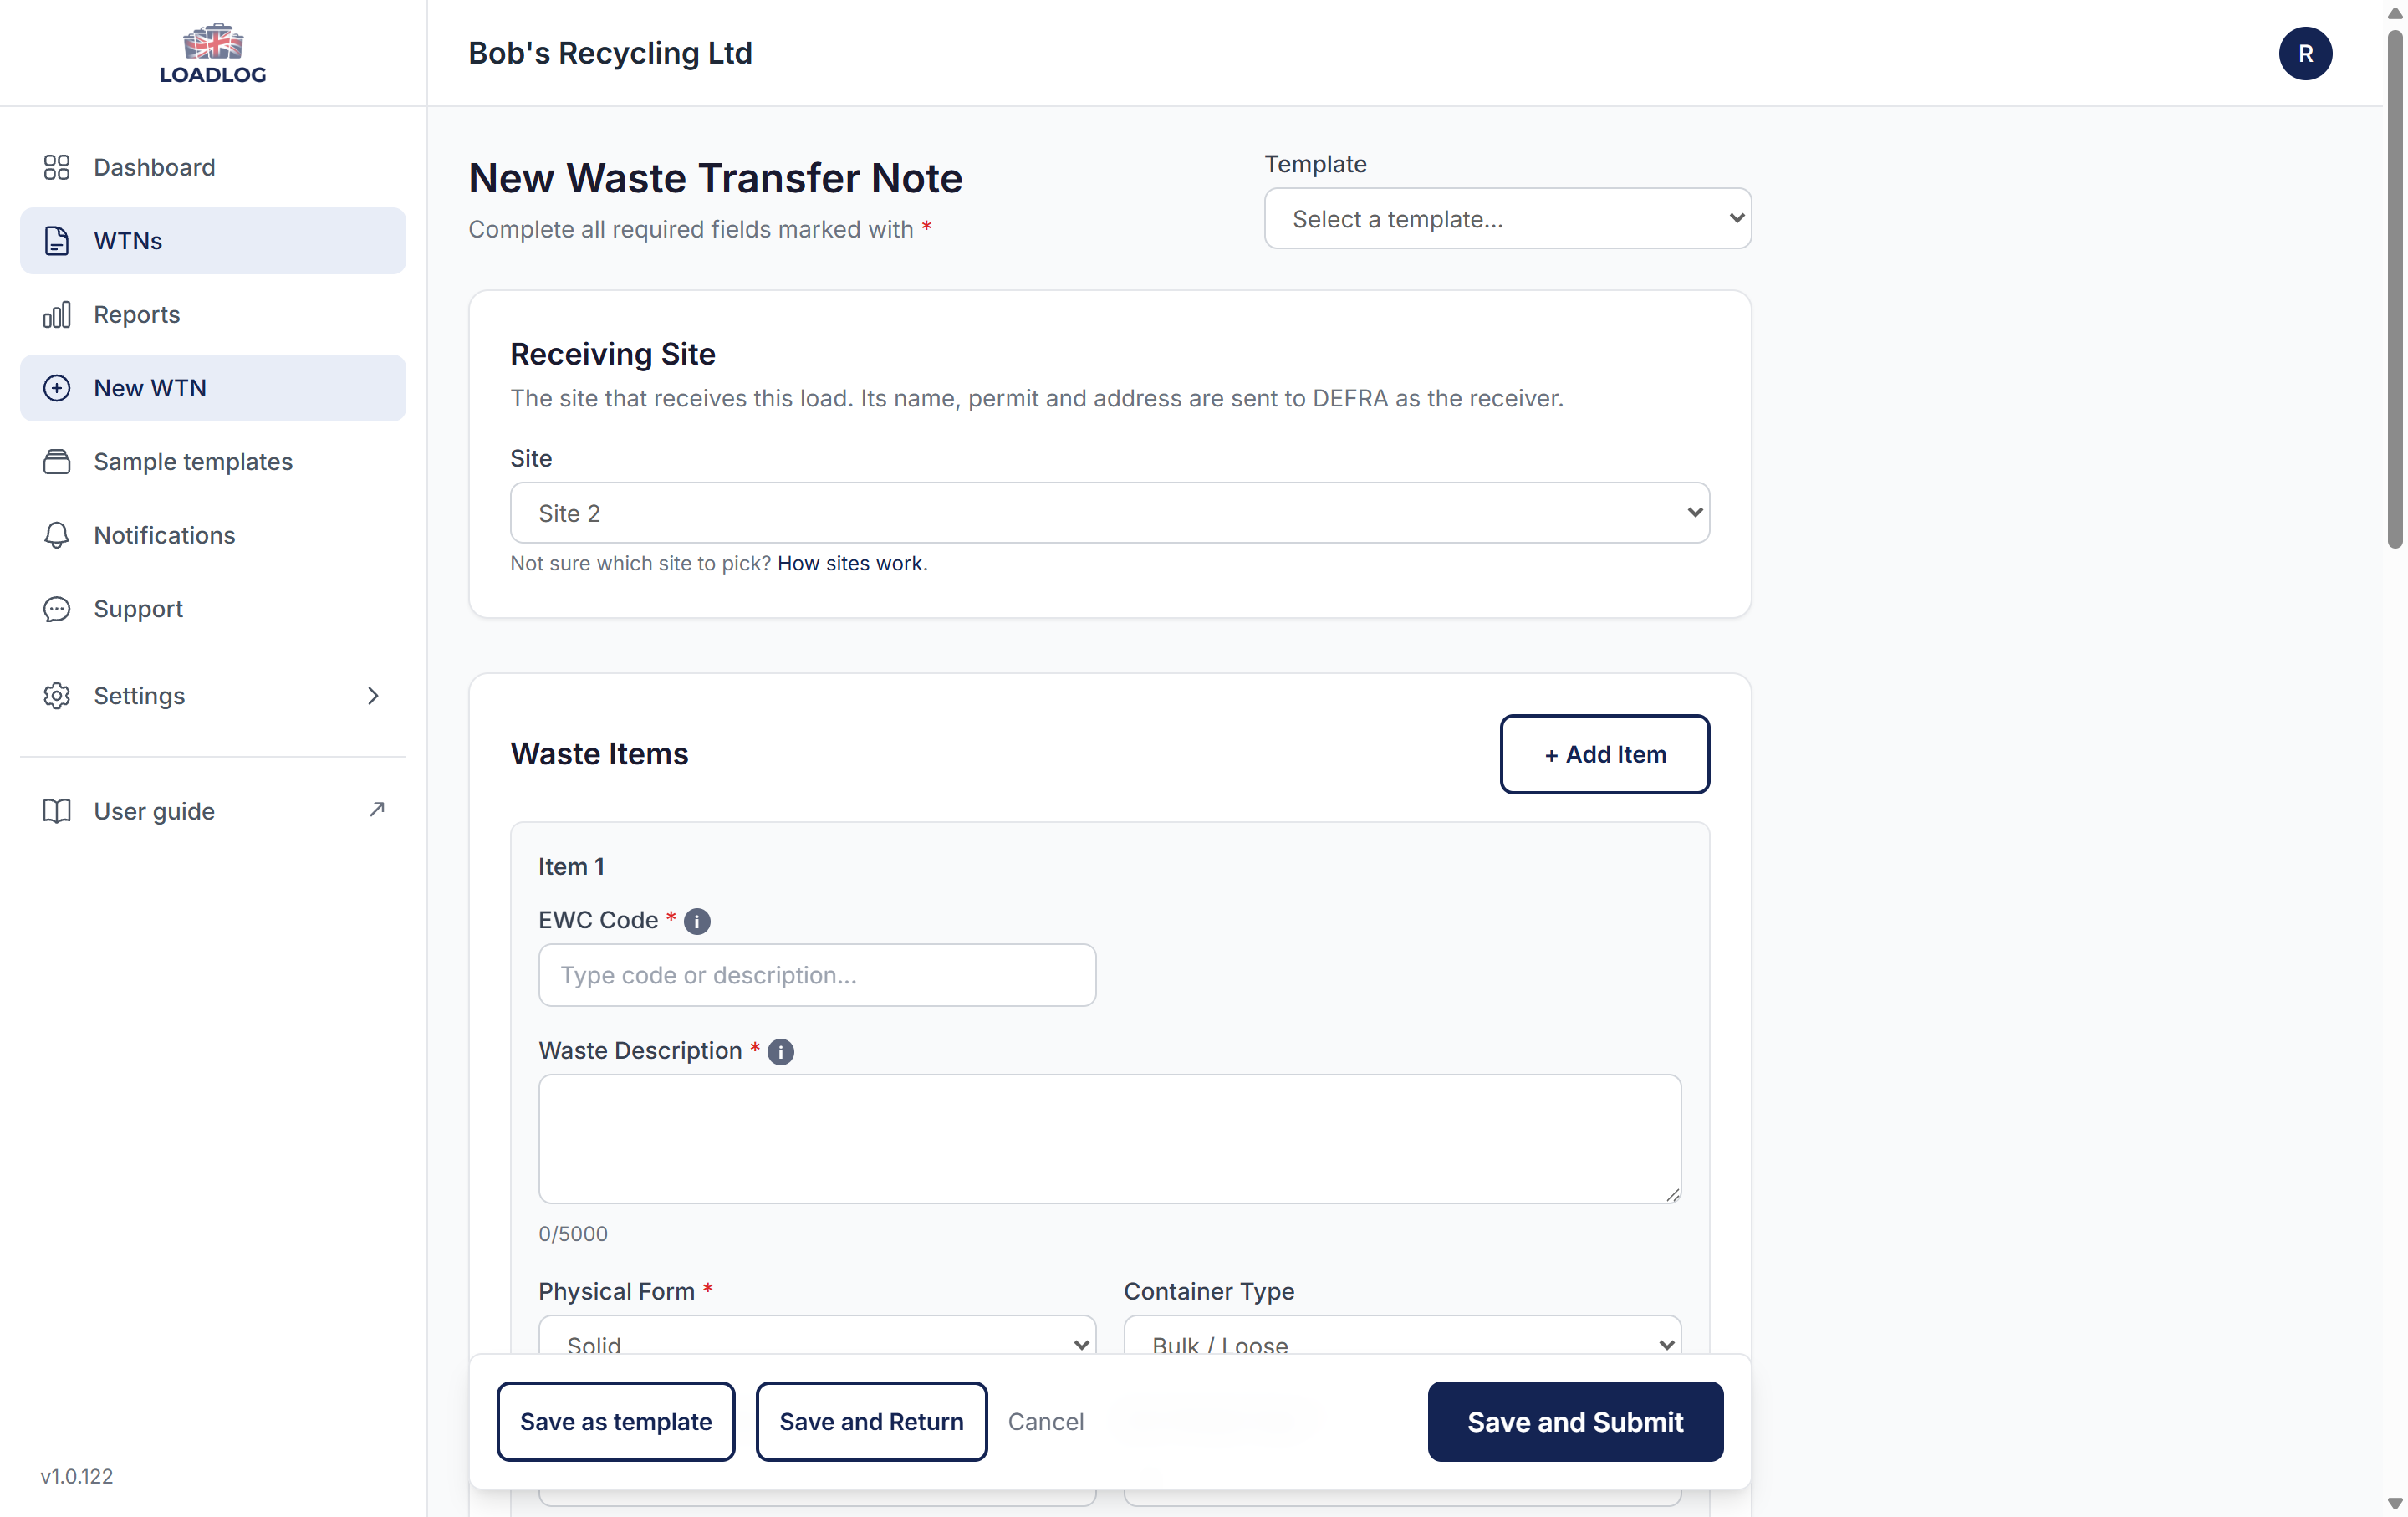
In your reports, the Sites row controls which sites the figures cover. All sites includes everything together, or tick individual sites to look at them on their own. Reports that list individual notes show a Site column, and your CSV and PDF downloads carry the same detail.
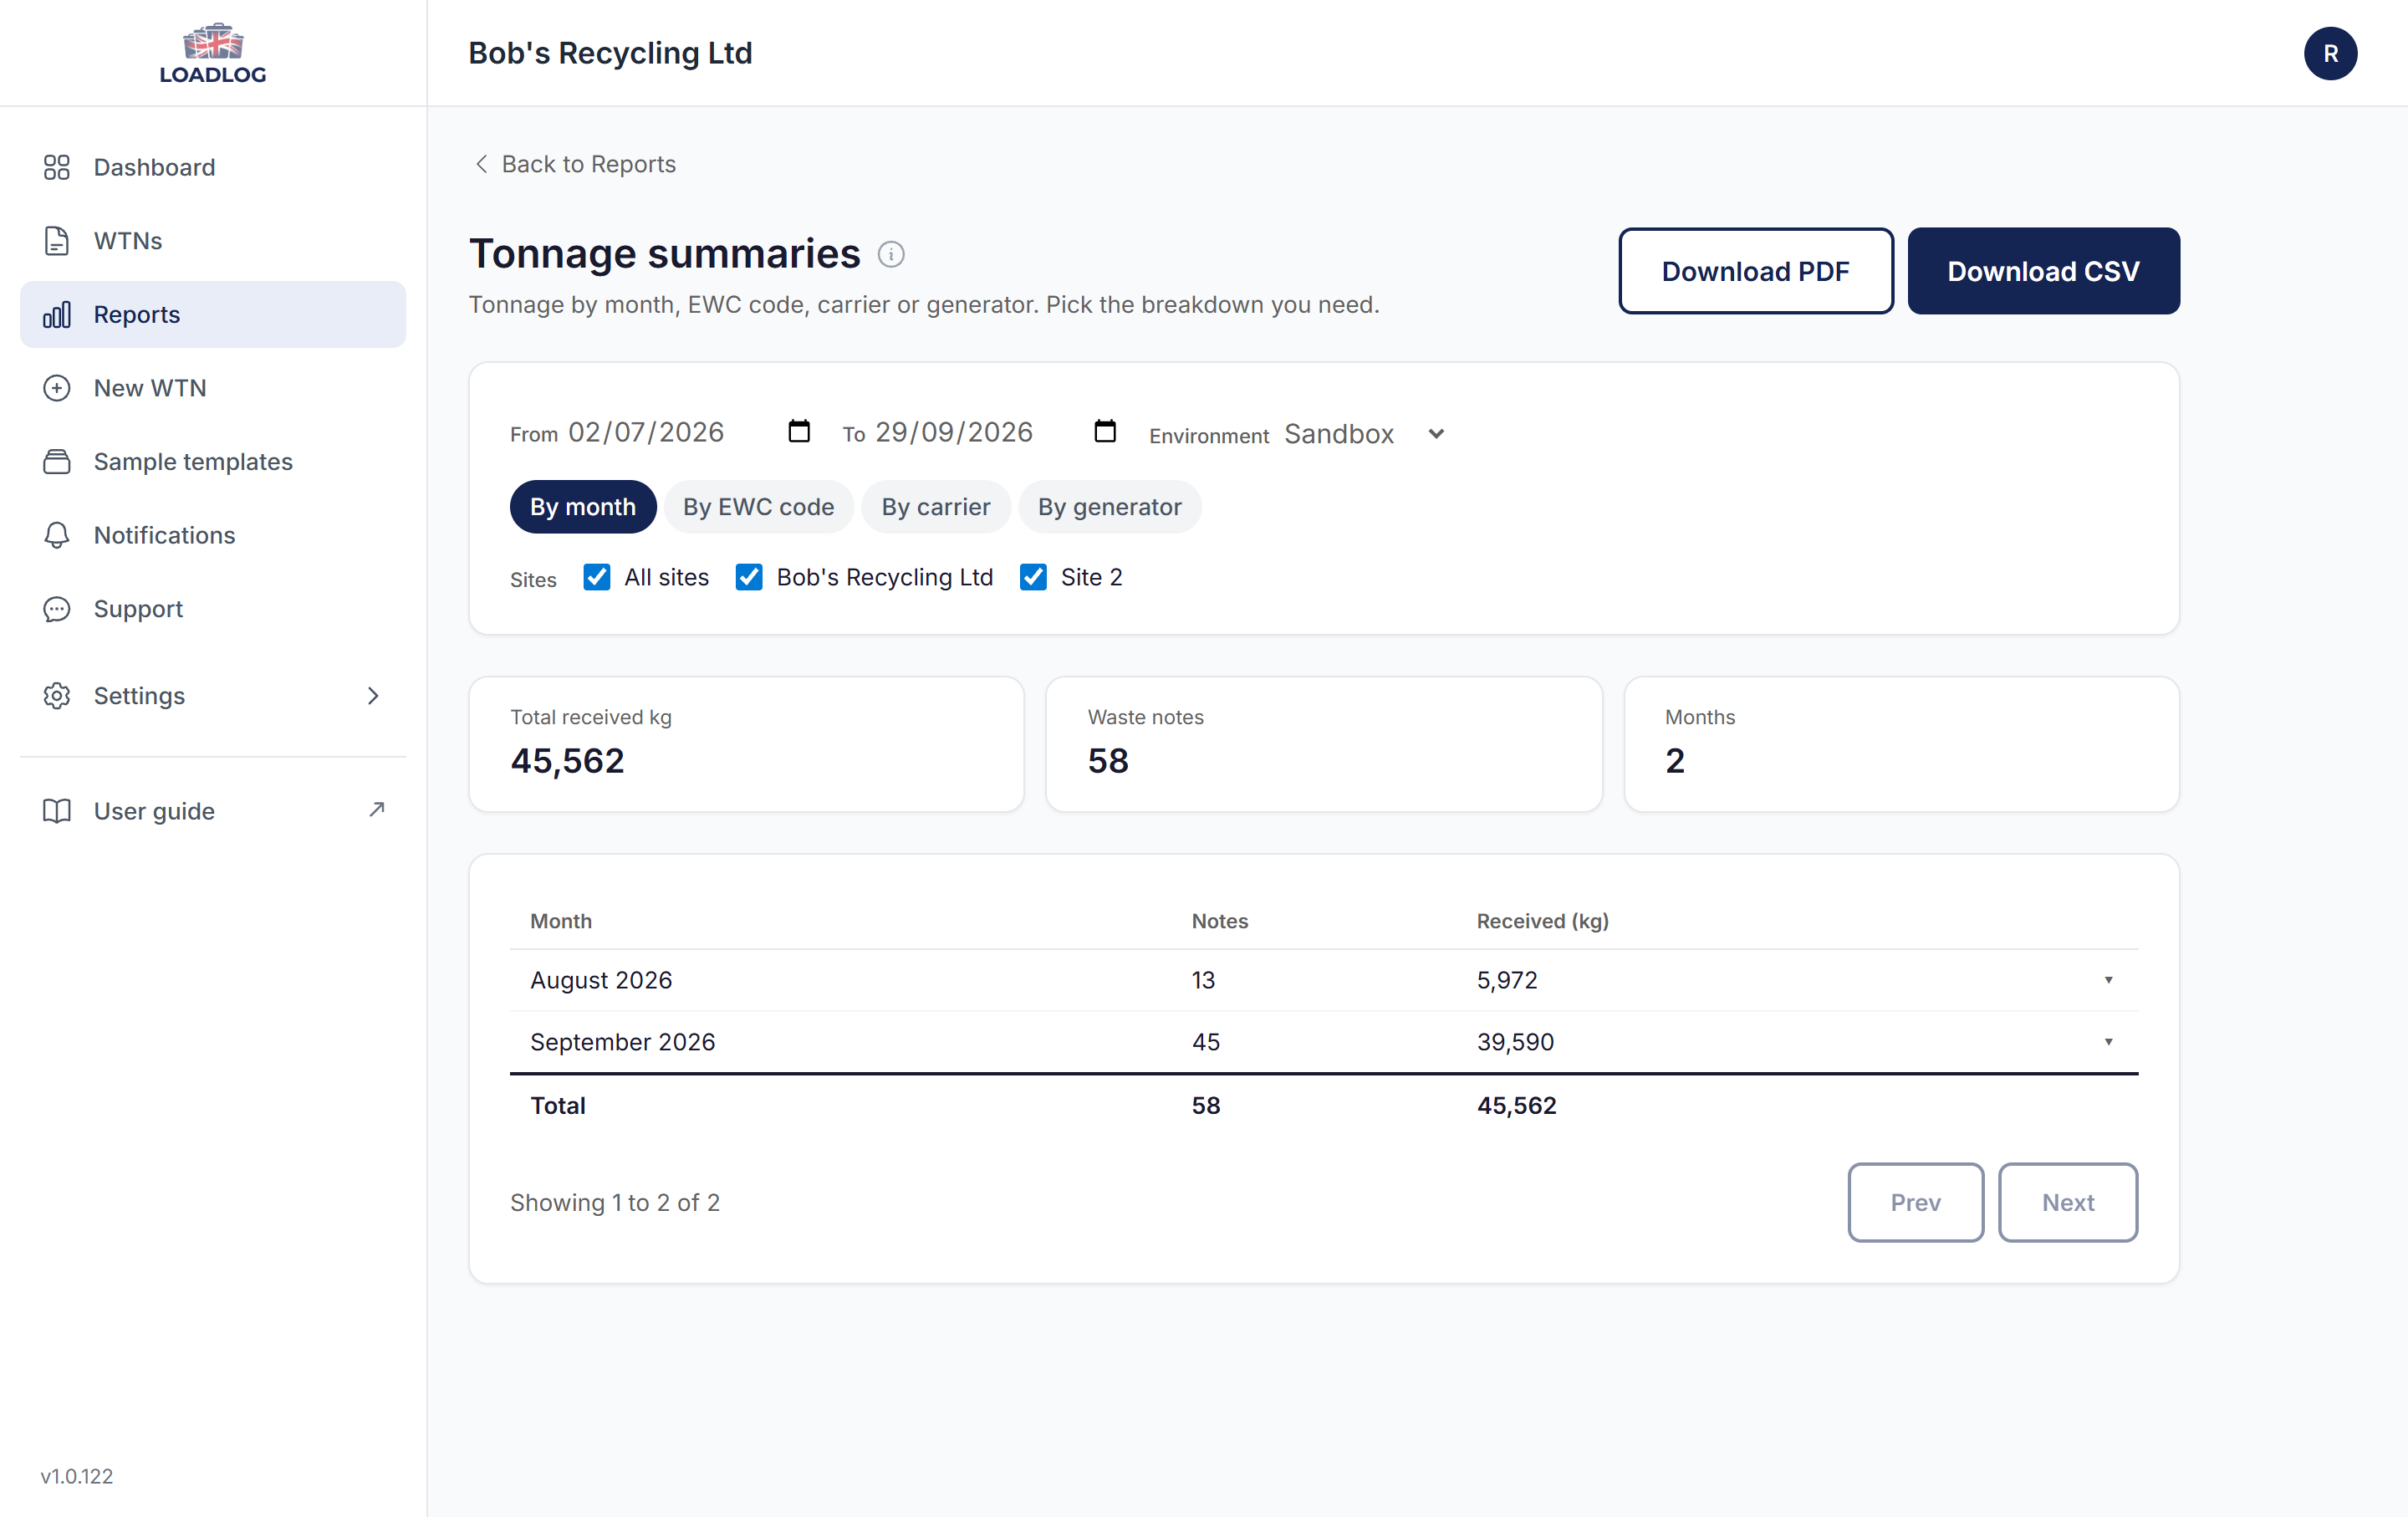
2. Creating a waste transfer note
You can create a note from the New WTN page, or from the New WTN button on the dashboard. Fields marked with * are required.
2.1 Start a new note
The form is split into sections: Waste Items, Carrier Information, Broker / Dealer Information, Origin, and Arrival & Signature. You can expand or collapse the optional sections. If you have templates saved, pick one from the Template dropdown at the top of the form to start with the common details already filled in. Templates are covered in section 2.10.
2.2 Waste items
Each note can hold one or more waste items. Click + Add Item to add another. If you are not sure what to enter in a field, click the (i) icon beside its label for a short explanation.
| Field | Notes |
|---|---|
| EWC code * | Pick from the built-in EWC code lookup. |
| Waste description * | Up to 5000 characters. |
| Physical form * | Solid, liquid, gas, powder, sludge or mixed. |
| Container type | What the waste is held in, not what delivered it (the lorry is recorded as the carrier). Bulk, bag, drum, tank, skip, wheelie bin, box, bale or other. |
| Number of containers | Defaults to 1. |
| Net weight (kg) * | The weight of this item. |
| Weight is estimated | Tick if the weight is an estimate rather than a weighed value. |
| Treatment codes | Optional, but DEFRA expect a D or R code per EWC code and may flag notes without one. Click + Add Code to add one or more. |
| Hazardous / POPs | Tick the boxes if the item contains hazardous substances or persistent organic pollutants. |

2.3 Carrier information
| Field | Notes |
|---|---|
| Carrier lookup * | Start typing the carrier name and select from the list. Choosing a carrier auto-fills the other carrier fields. Covers all four UK nations using the public registers. |
| Carrier registration (manual entry) | The carrier's permit number, also called their registration. Enter it here if the carrier is not in the lookup. |
| Carrier name (manual entry) | Optional. |
| Reason for no carrier registration * | Required if no registration is given. Options are waste transferred on site, household waste transfer, one-off collection (unregistered carrier), or marine waste transfer. |
| Vehicle registration * | The vehicle carrying the waste. |
Carrier lookup covers all four UK nations.
2.4 Broker, dealer and origin (optional)
Expand Broker / Dealer Information if a broker or dealer was involved in the transfer. Expand Origin to record the waste generator's name, SIC code and address.
2.5 Arrival and signature
| Field | Notes |
|---|---|
| Waste arrival date/time * | When the load arrived on site. |
| Signed by | Sign on screen on behalf of your organisation. Click Clear Signature to start the signature again. |

2.6 Save a draft
If you are not ready to submit, click Save and Return. Your note is saved as a draft and added to your WTNs list, and you can come back and finish it any time. Save and Open saves the note too, then opens it, ready for you to send it to DEFRA.
A draft is not sent to DEFRA. It sits in your WTNs list with a Draft status until you open it and submit it. Nothing is submitted until you do.
2.7 Submit later
Open your WTNs list
Go to WTNs and set the status filter to Draft to see everything waiting on you.
Click Edit
Draft and rejected notes show View, Duplicate, Edit and Delete in the Actions column, as icons with hover labels. Click the pencil icon to edit a draft and carry on where you left off.
Finish and submit
Complete the remaining fields and add the signature, then click Update Draft. LoadLog saves the note and takes you back to its page, where you click Submit to DEFRA to send it to DEFRA. If a draft needs no changes, you can open it and click Submit to DEFRA straight away.
2.8 Statuses
Every note has a status, and you can filter the WTNs list by it.
- Draft: saved but not yet sent to DEFRA.
- Submitted: DEFRA accepted the receipt and gave it a waste tracking reference.
- Rejected: DEFRA refused the receipt when it was sent. LoadLog explains what to check, and the note shows DEFRA's exact message, so you can put it right and send it again. If you no longer need it, you can delete it, just like a draft; the audit log records the removal.
If something needs changing on a note DEFRA has already accepted, open the note and click Correct this receipt. LoadLog sends the change to DEFRA against the same waste tracking reference, and the note's record shows when it was last corrected. If a run of submitted notes needs the same correction, Bulk edit does them together: see section 2.14.
Before your note is sent, LoadLog pre-checks the submission and tells you about any issues it finds. If DEFRA refuses the receipt, LoadLog tells you what to check on the page so you can fix it and send it again. If the DEFRA service itself cannot be reached, LoadLog retries the submission automatically for around ten hours, and you can still try again yourself at any time.
2.9 Sandbox and production
Each note records the environment it was created in: sandbox or production. Use the sandbox while you are testing, then switch to production for real loads. The WTNs list lets you filter by environment so you can tell test records apart from real ones.
If you tested in the sandbox and have since gone live, the notes you sent then can still become production records: see section 2.13.
2.10 Templates
Templates save the details of loads you handle regularly, so a repeat entry takes seconds instead of retyping the same codes and descriptions.
Templates and bulk entry. Templates are also the starting point for bulk entry (section 2.11). Bulk entry takes everything the template supplies, then asks for just the details that change from load to load, such as the registration and the weight. If you plan to use bulk entry, it is worth spending a few minutes getting the template right first, because a wrong code or description there is repeated on every row of the batch.
Save a template. Fill in a new WTN with the details you want to reuse, then click Save as template at the bottom of the form and give it a name. You can also save an existing note as a template from its page. Templates are shared with everyone in your organisation.
Use a template. On the New WTN form, choose a template from the Template dropdown at the top. The saved details are filled in for you, including the waste items with their codes and descriptions, the carrier and vehicle details, and the broker or dealer and waste origin information. Where you have set them, hazardous property codes, POPs details and treatment codes are saved too. Arrival date, time and signatures are not part of a template, so every note still records what actually arrived and who signed.
Manage your templates. Open Settings, then Templates, to edit, rename or delete any template in your organisation. The number you can save depends on your plan: Free up to four, Compliance Lite up to ten, and Compliance Plus and Enterprise up to fifty.
Sample templates. LoadLog publishes a library of ready-made templates for common loads, covering metal recycling, vehicle breakers, transfer stations, skip hire, ITAD, composting, hazardous waste, construction and demolition, anaerobic digestion, landfill and MRF. Open Sample templates in the sidebar to browse the library and preview any template. Each one covers the waste classification only, so you add the weight, carrier and signature for each load. On paid plans, click Use template to copy it into your organisation, ready to edit like any other template. Copies count towards your plan's template limit.
Sample templates are LoadLog's interpretation of DEFRA's published waste catalogue and guidance. They are a starting point, not legal advice. Check the code and classification against your own waste before you submit, and confirm with your regulator if you are unsure.
2.11 Bulk entry
Bulk entry is for days when a lot of similar loads come through. You set up a template once, then enter one line per load on a single grid, without retyping the details that never change. When the rows are ready you review them, sign once, and the whole batch goes to DEFRA together. Each note still records its own load; they simply share one signature.
Bulk entry is available on paid plans. The rows you enter count towards your plan's monthly allowance: 1,000 rows a month on Compliance Lite, 5,000 on Compliance Plus, and 25,000 on Enterprise. CSV imports count towards the same allowance. One batch can hold up to 250 loads; if you go over, the page will ask you to split it.
The walkthrough below follows a vehicle breaker through a normal morning, with twelve end-of-life cars arriving before lunch. If your site handles something else, the steps are the same and only the template changes. If you would rather not build a template from scratch, the sample library has ready-made ones, including undepolluted vehicles and depolluted shells.
Make the template (once)
- Open New WTN from the sidebar.
- Fill the note in as if you were recording one real load: the waste item (code, description, physical form, container), the hazardous details, and the carrier arrangements that are always the same.
- When the details look right, click Save as template at the bottom of the page and give it a name your team will recognise, such as "Scrap cars - undepolluted".
- You will find it later under Settings, then Templates, where you can edit, rename or delete it.
For the walkthrough, the template holds: EWC code 160104, the description "End-of-life vehicles", solid, hazardous. If your hazardous property codes are always the same for this waste, set them on the template too, and the grid will not ask for them on every row.
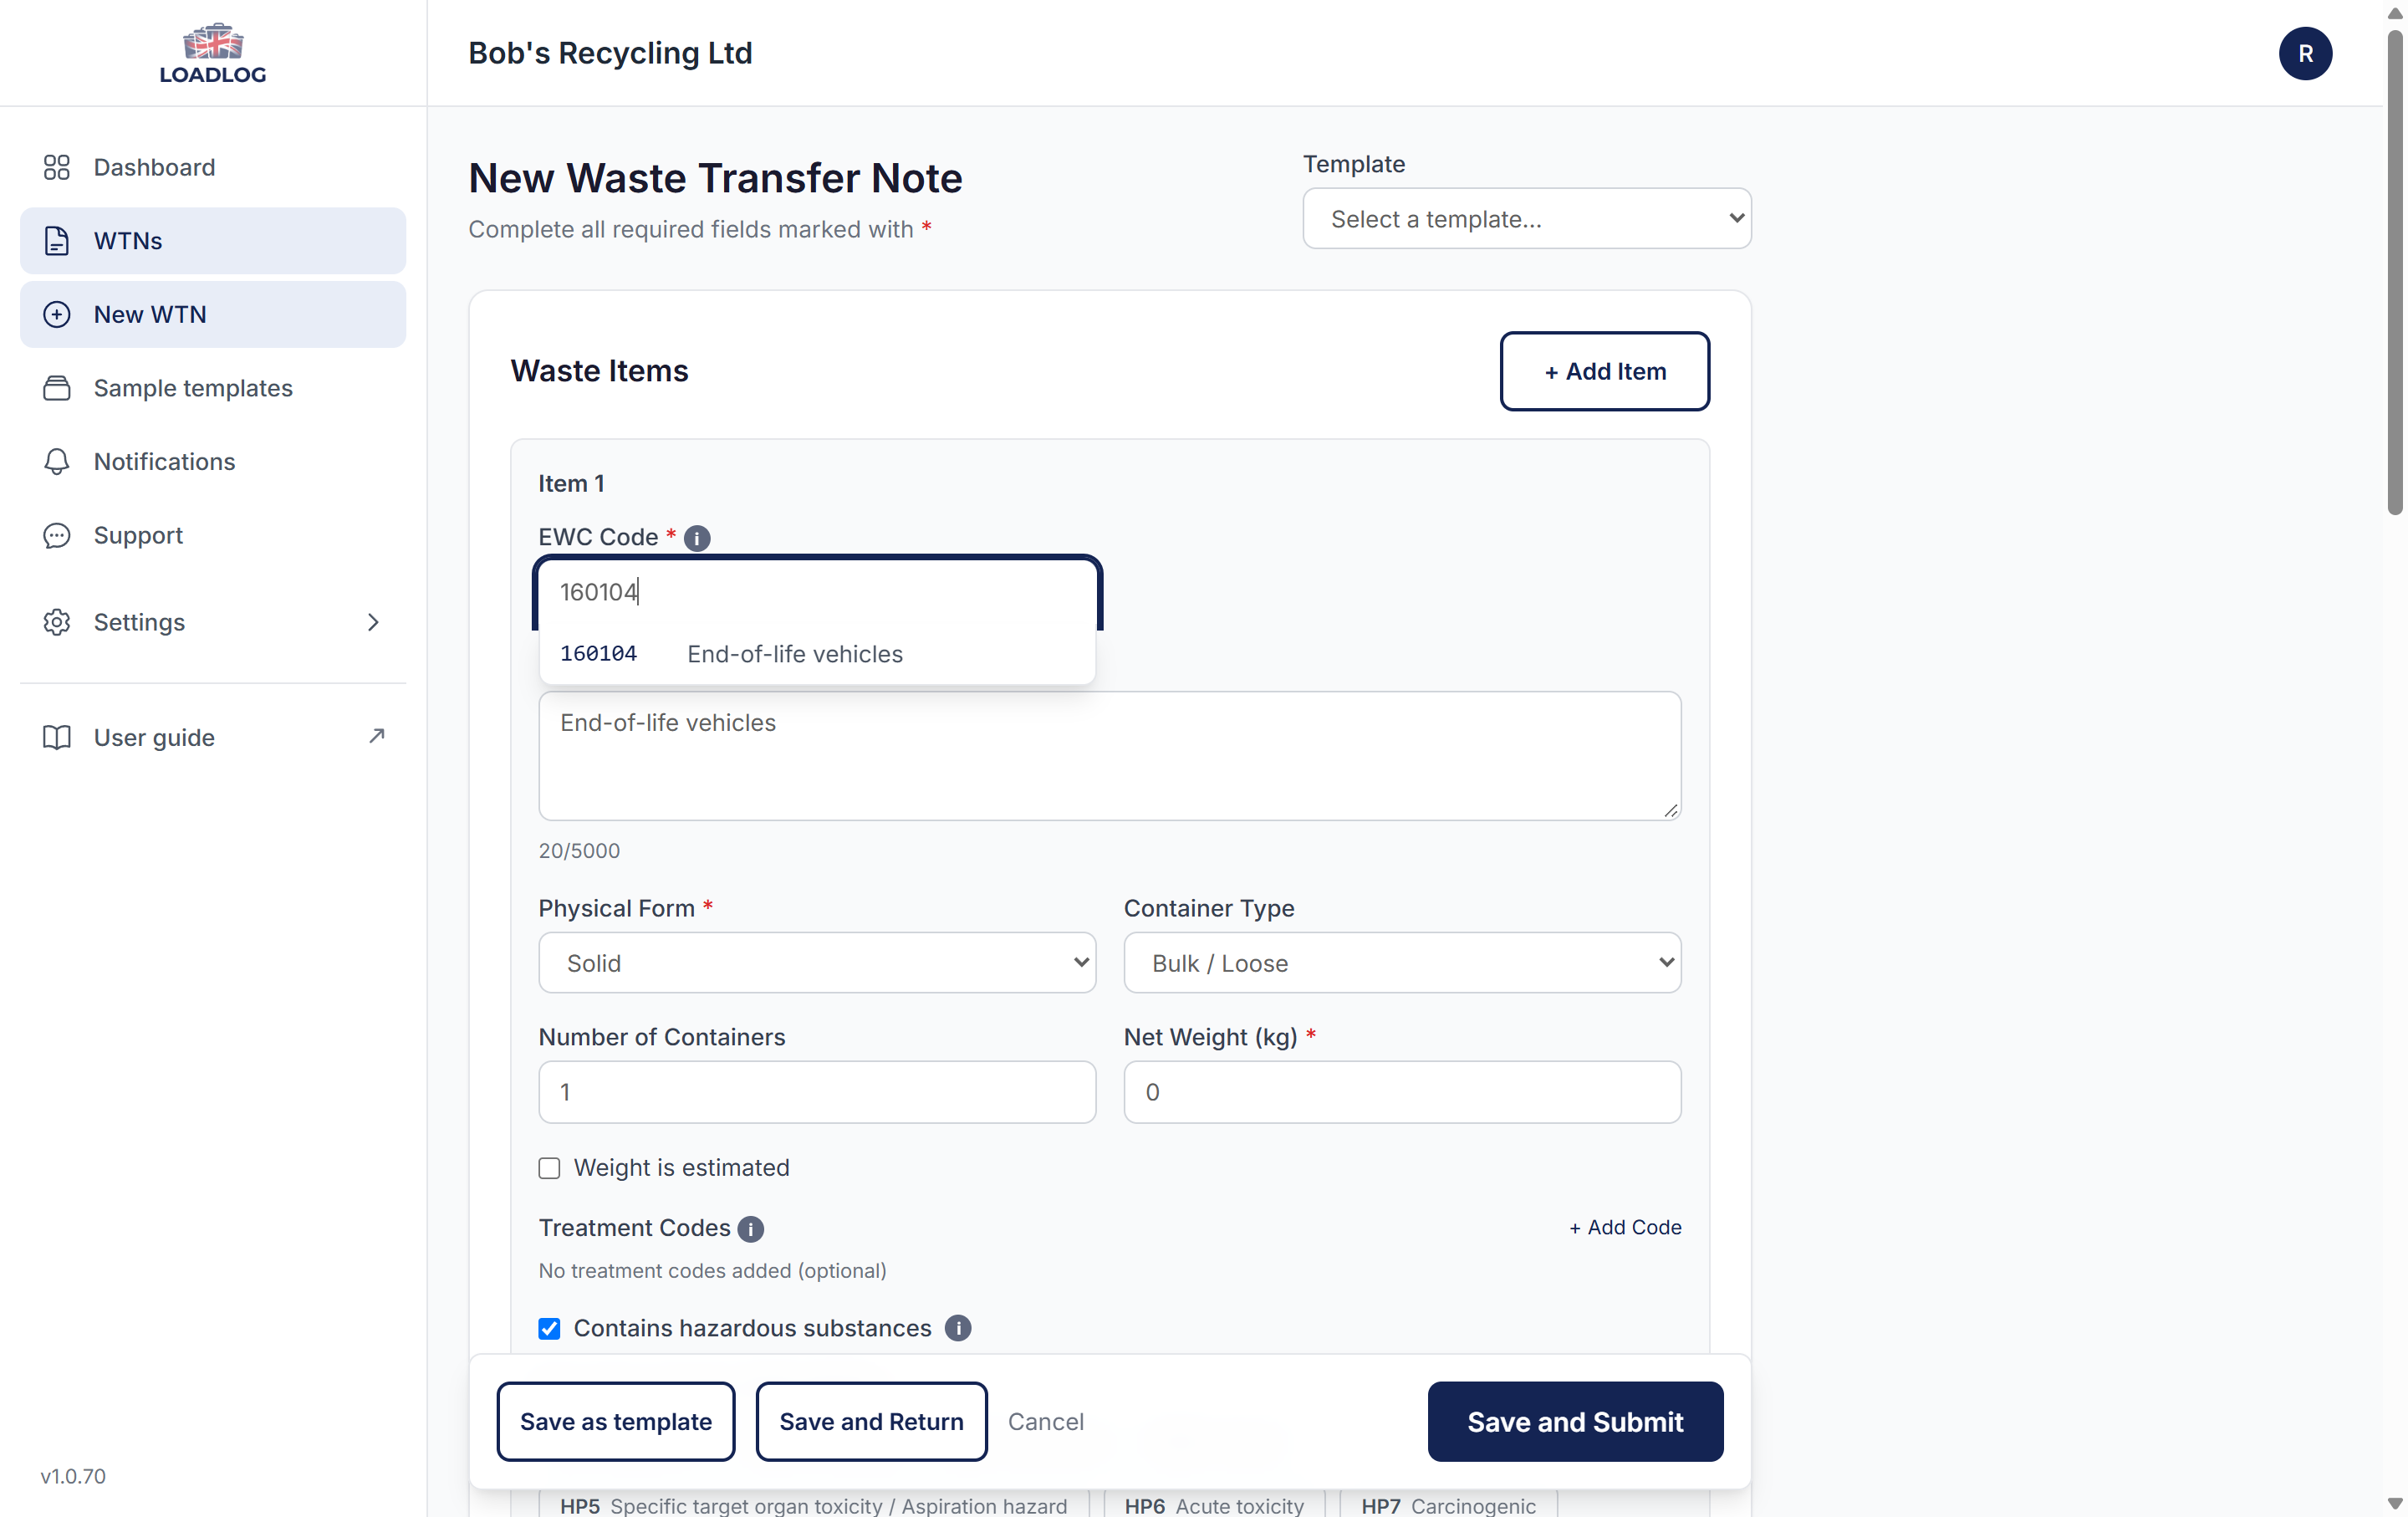
Test it once
Before pointing bulk entry at a new template, give it a single run. Start a new WTN, choose the template in the Template dropdown, check the classification looks right, and submit the note. If you have not gone live yet, do this in your sandbox environment. One clean test note now saves you from repeating a mistake across a whole batch later.
Run the batch
- On the WTNs page, click Bulk entry (it sits next to Import).
- Choose your template and click Continue to rows. The page then shows two lists: what the template supplies, and what it will ask for on each row, so there are no surprises.
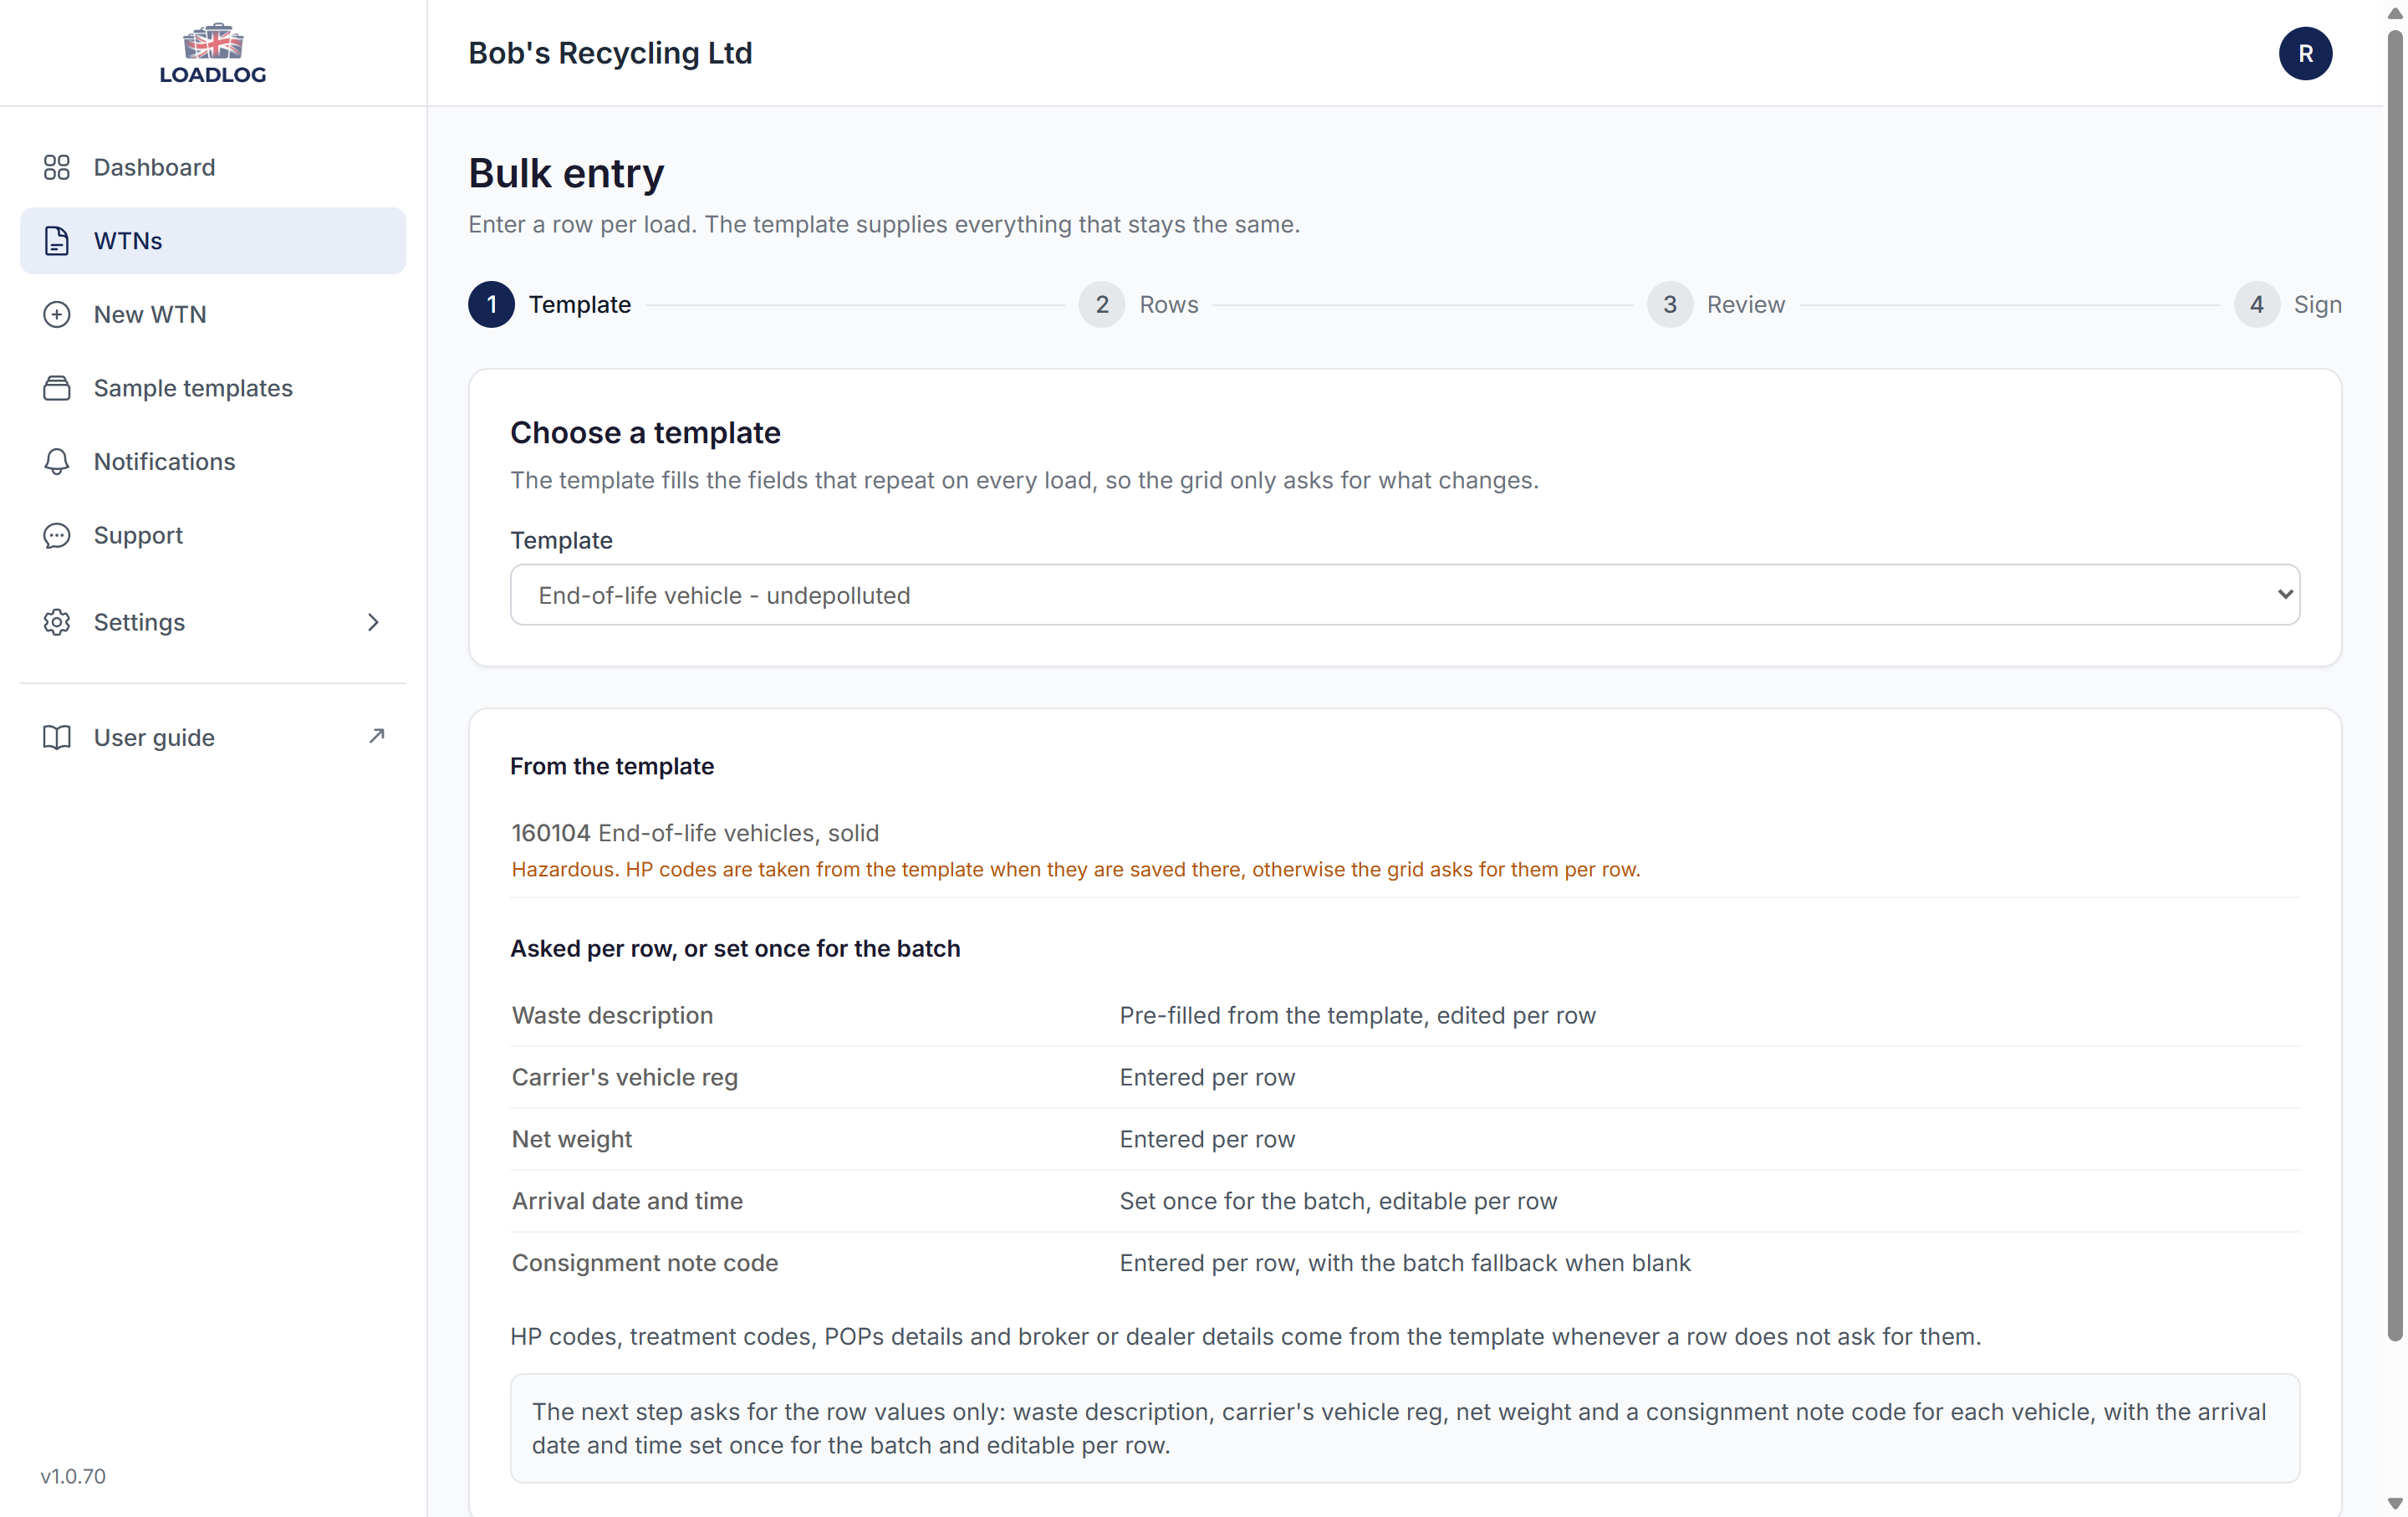
- At the top, set the details that are the same for the whole batch: the arrival date and time (used on every row unless a row gets its own), the weight unit, and, if some rows will not have a consignment note code, what to say instead on those rows. If you change any of these after adding rows, click Apply to all rows to update the rows already entered. If every row will have its own code, leave it on No fallback.
- Add one row per car. Type the registration, the weight, and anything else the grid asks for. Cells with a set list of answers, such as the container or the reason for no carrier registration, can be picked from a menu or pasted in. You can paste code lists such as "HP3, HP14" into the hazardous cell, and paste straight from a spreadsheet into most cells.
- If row one holds a value that belongs on every row below, such as a SIC code or a set of hazardous codes, click the small copy arrow beside that cell and it fills the column for you.
- Watch the short red notes under each row as you go. They point out things to fix, such as a missing weight, before you move on.
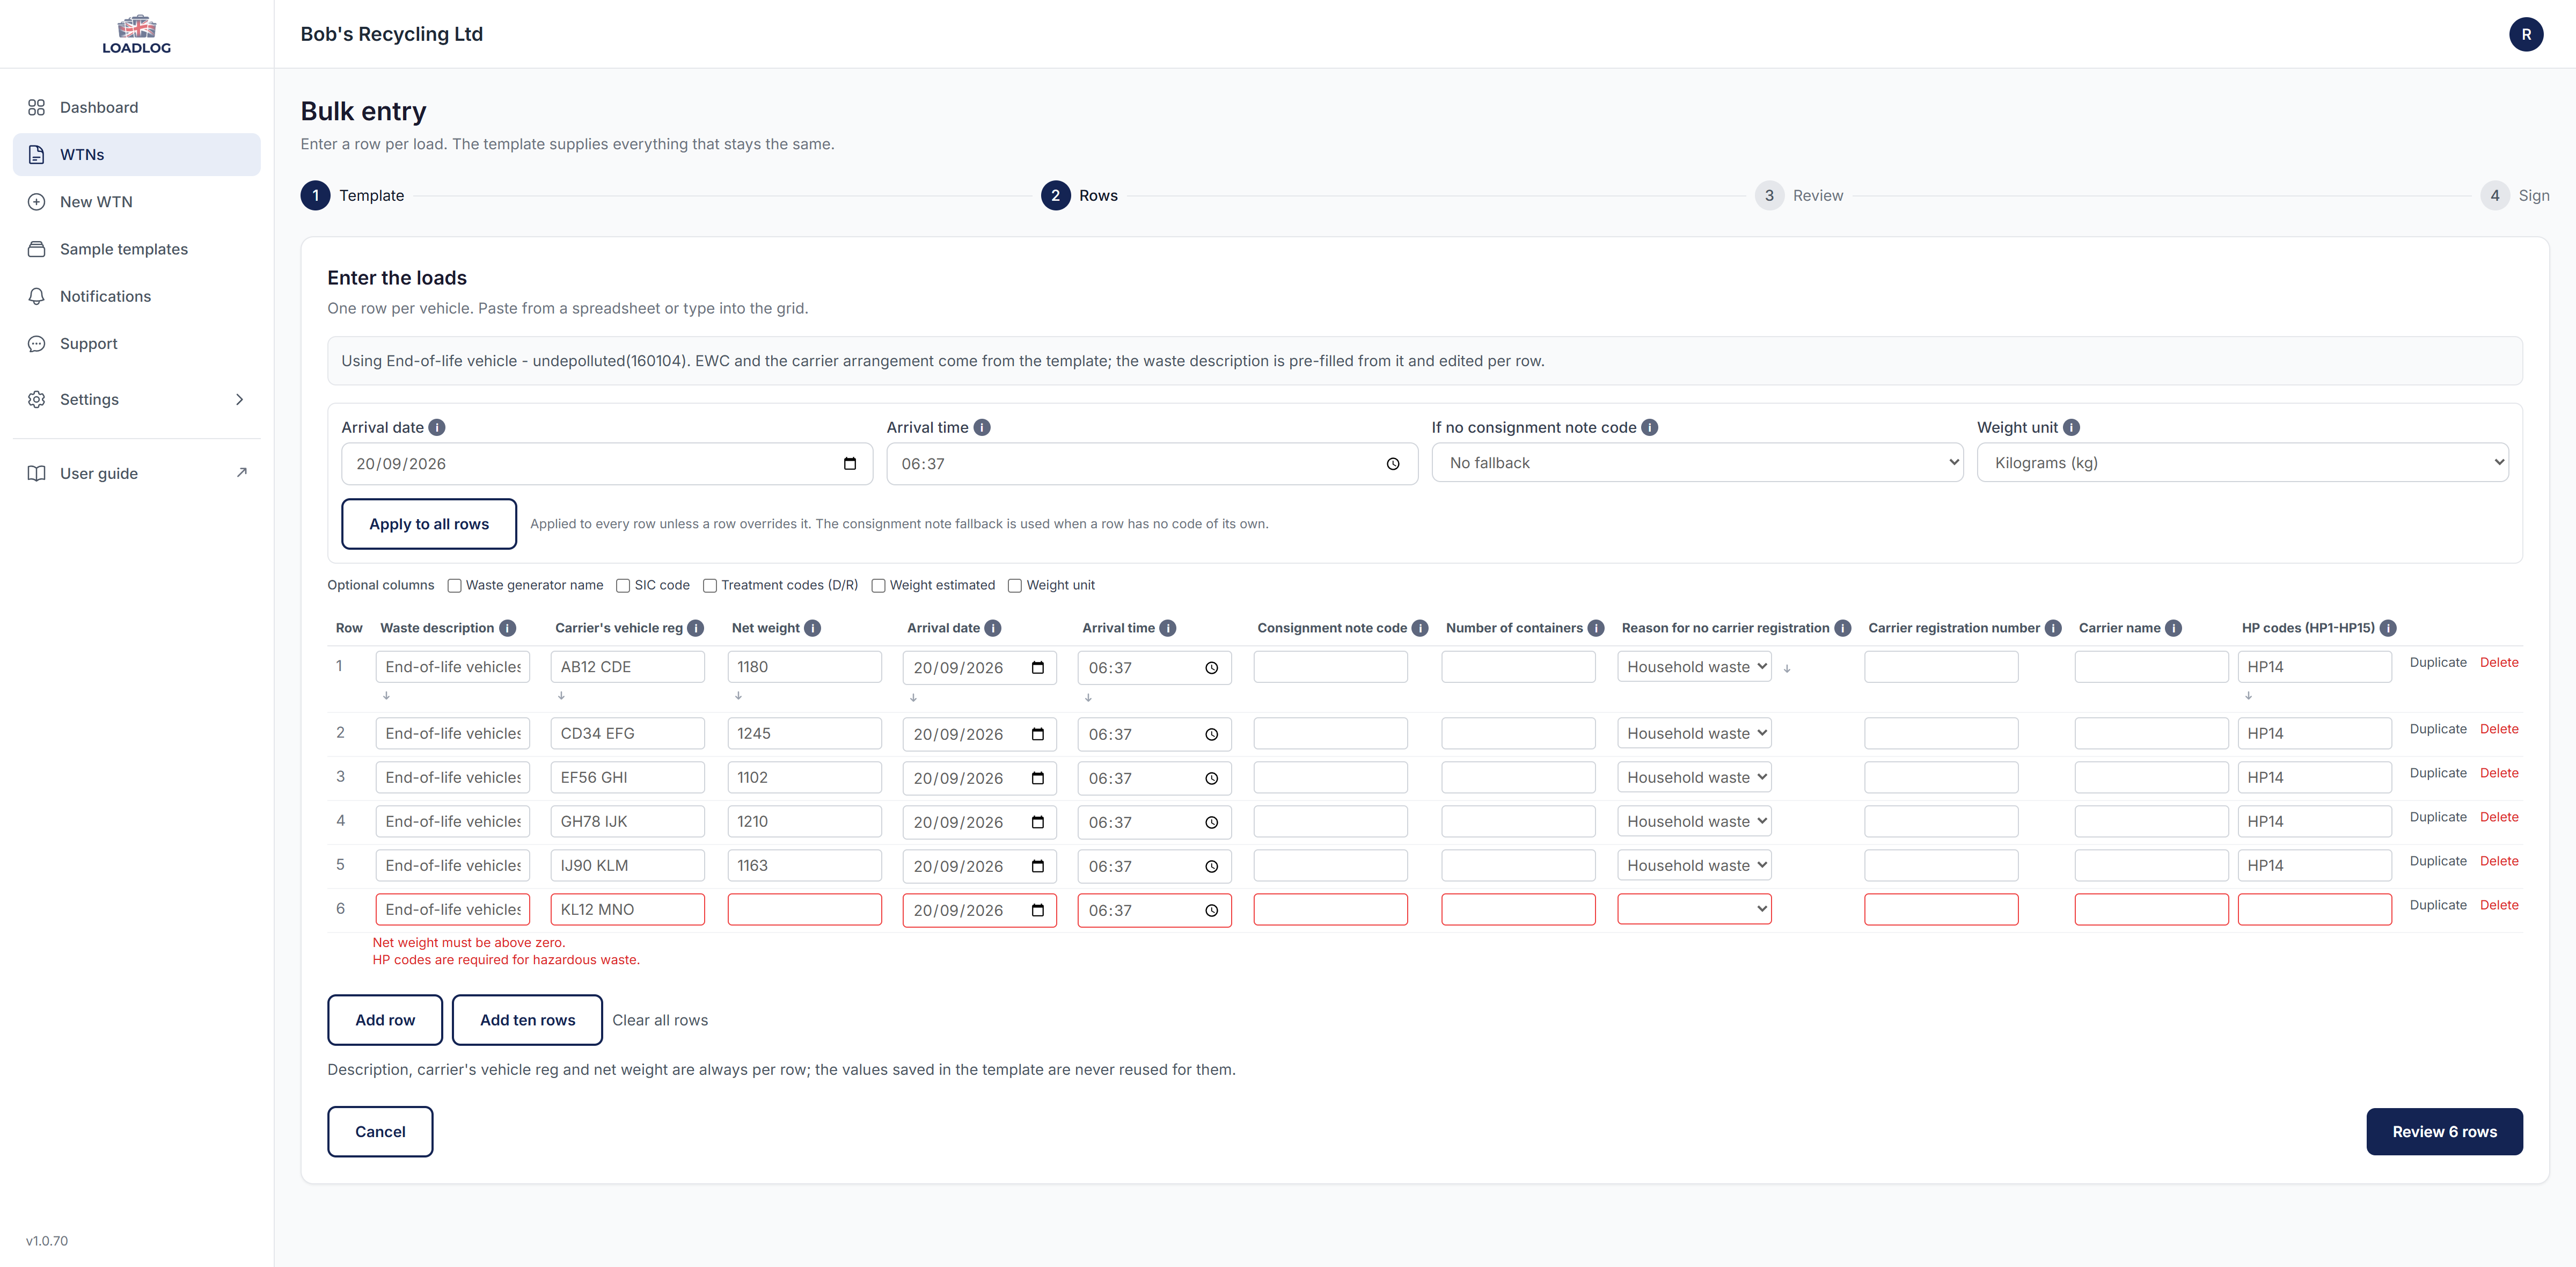
- When every car is in, click the review button at the bottom, which shows how many rows you have.
- On the review screen each row shows Ready, a Warning or an Error. Nothing has been created yet, and error rows are held back so the rest can go through. Warnings do not hold a row back; they are notes to yourself, such as a missing treatment code. You can download the problem rows as a CSV if that is easier to check.
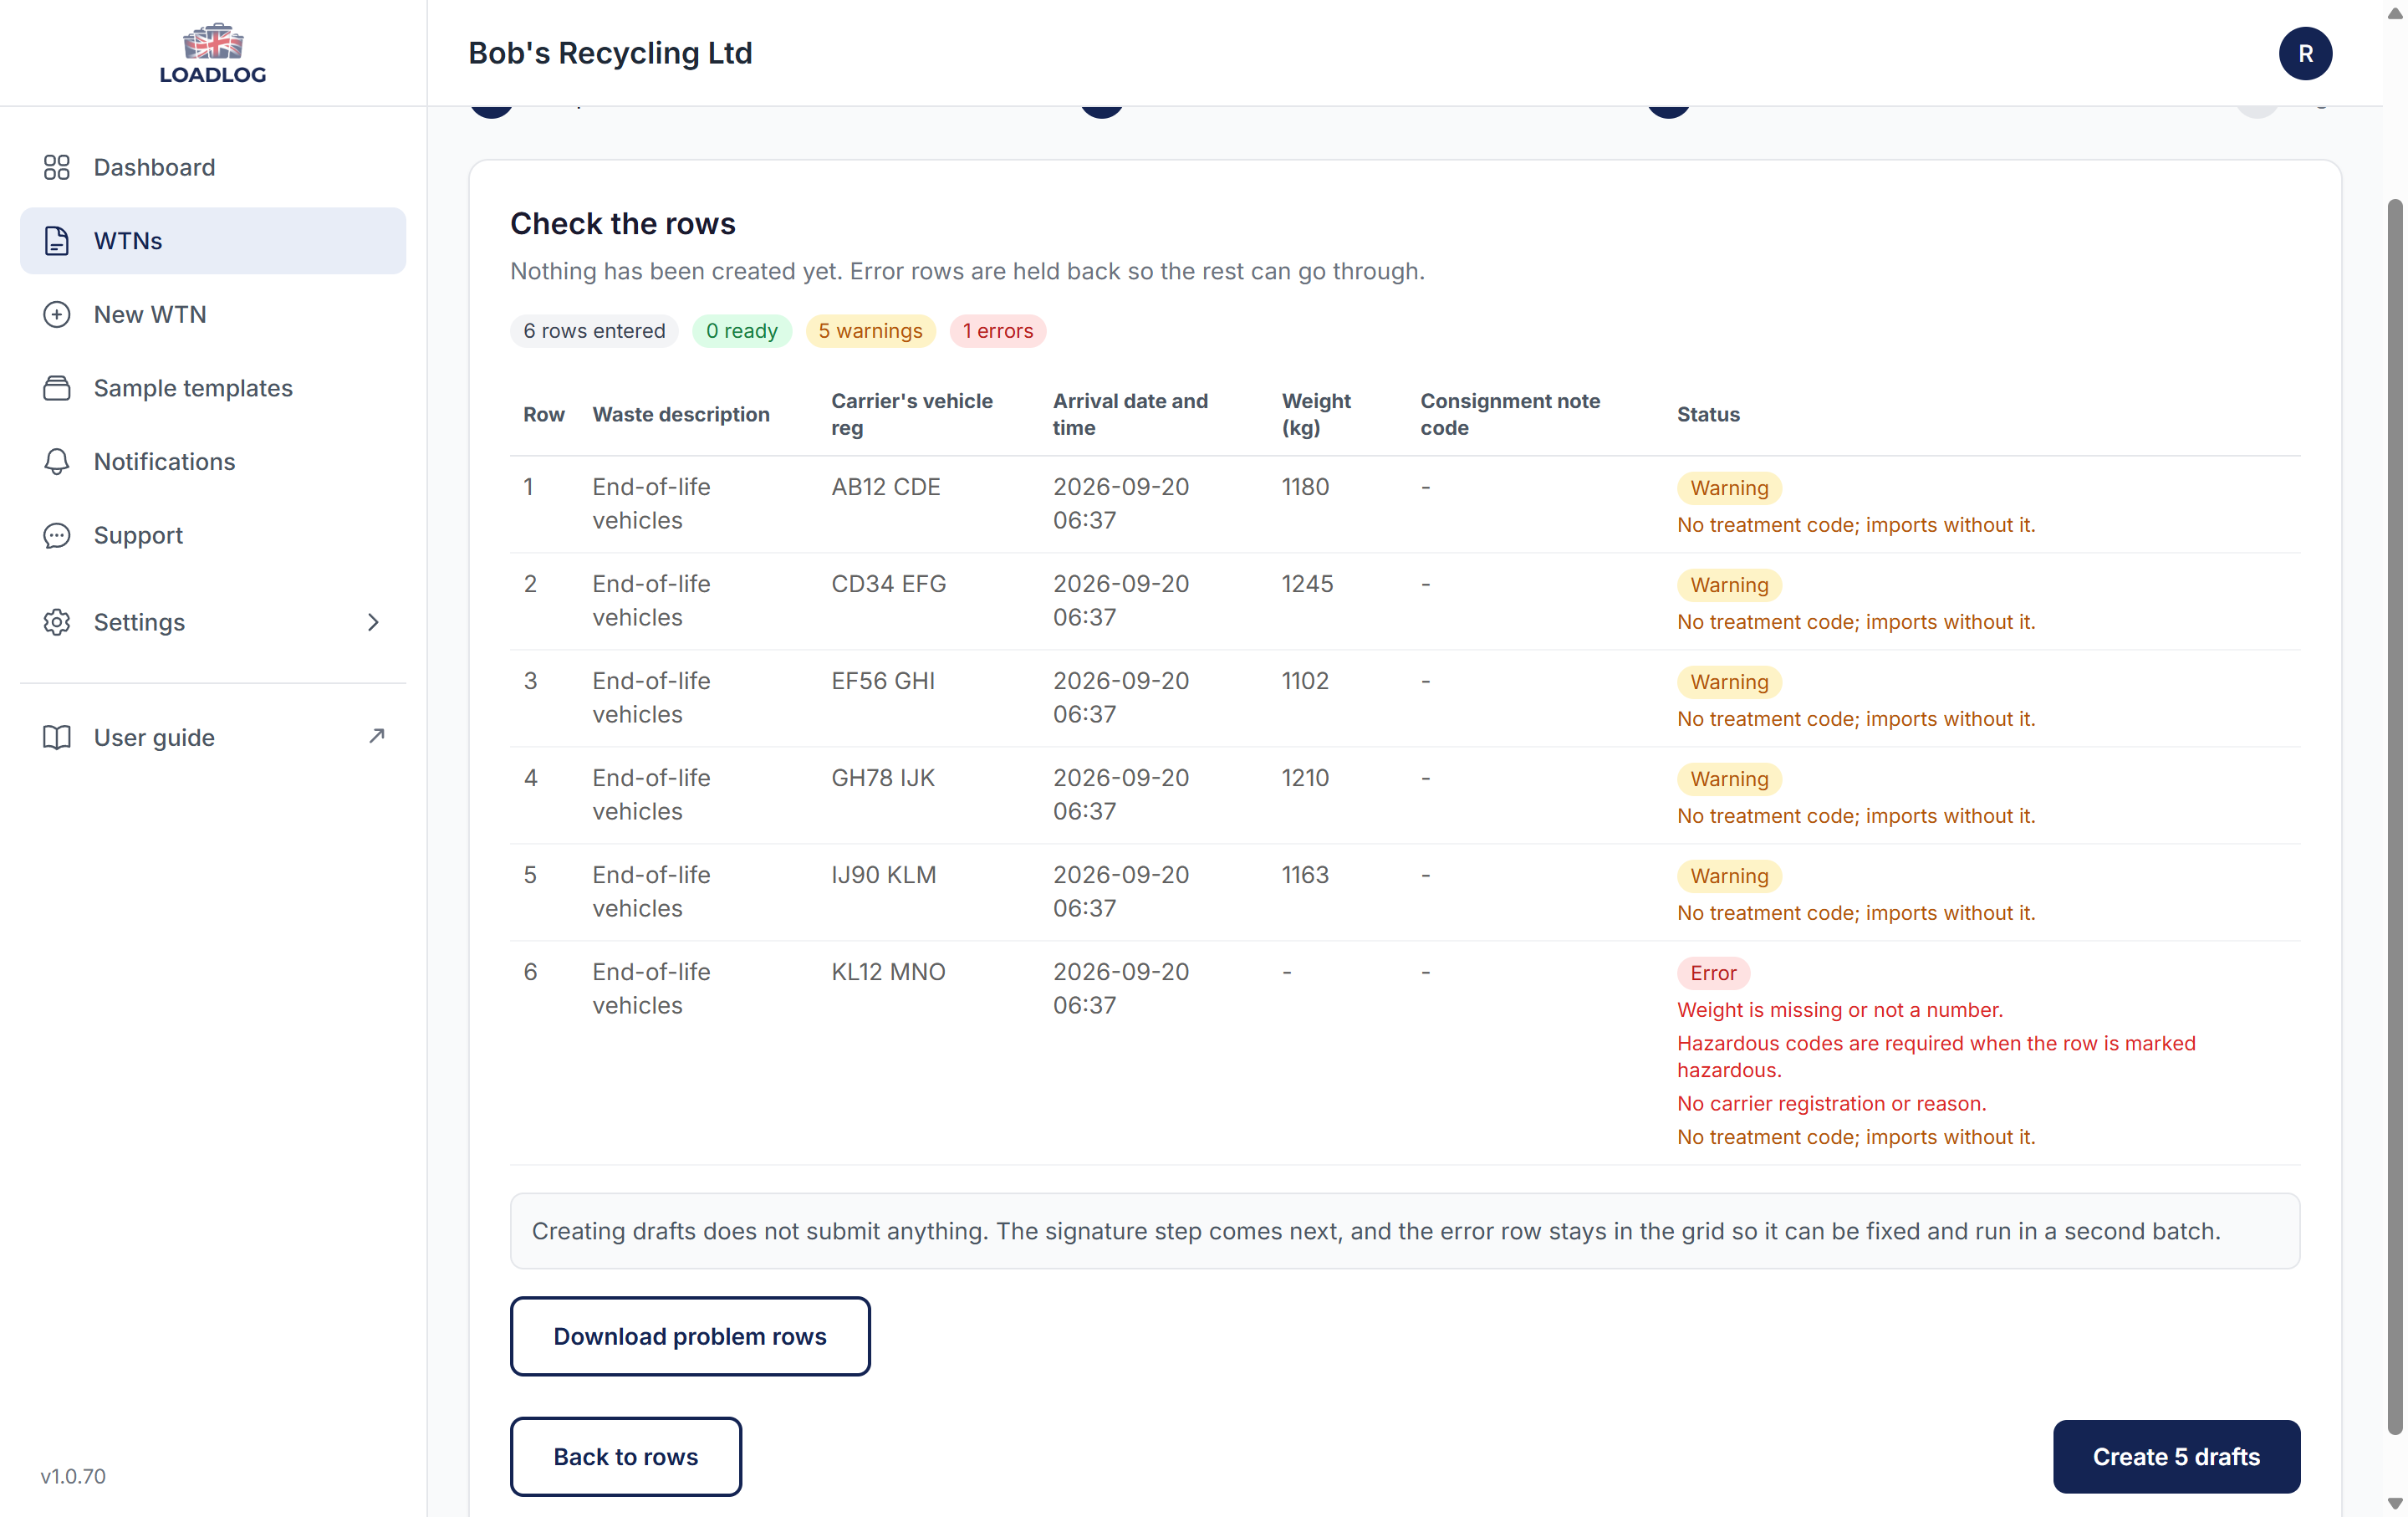
- Click Create drafts. The good rows become draft notes. Nothing has been sent to DEFRA at this point, and any error rows stay in the grid so you can put them right later.
- Sign once. Type the name of the person signing into "Signed By", draw the signature, and click Submit to DEFRA. One signature covers the batch, and each note records it. You can watch the progress as each note is submitted on its own. If a submission fails, that note stays as a draft you can edit and resubmit from its own page.
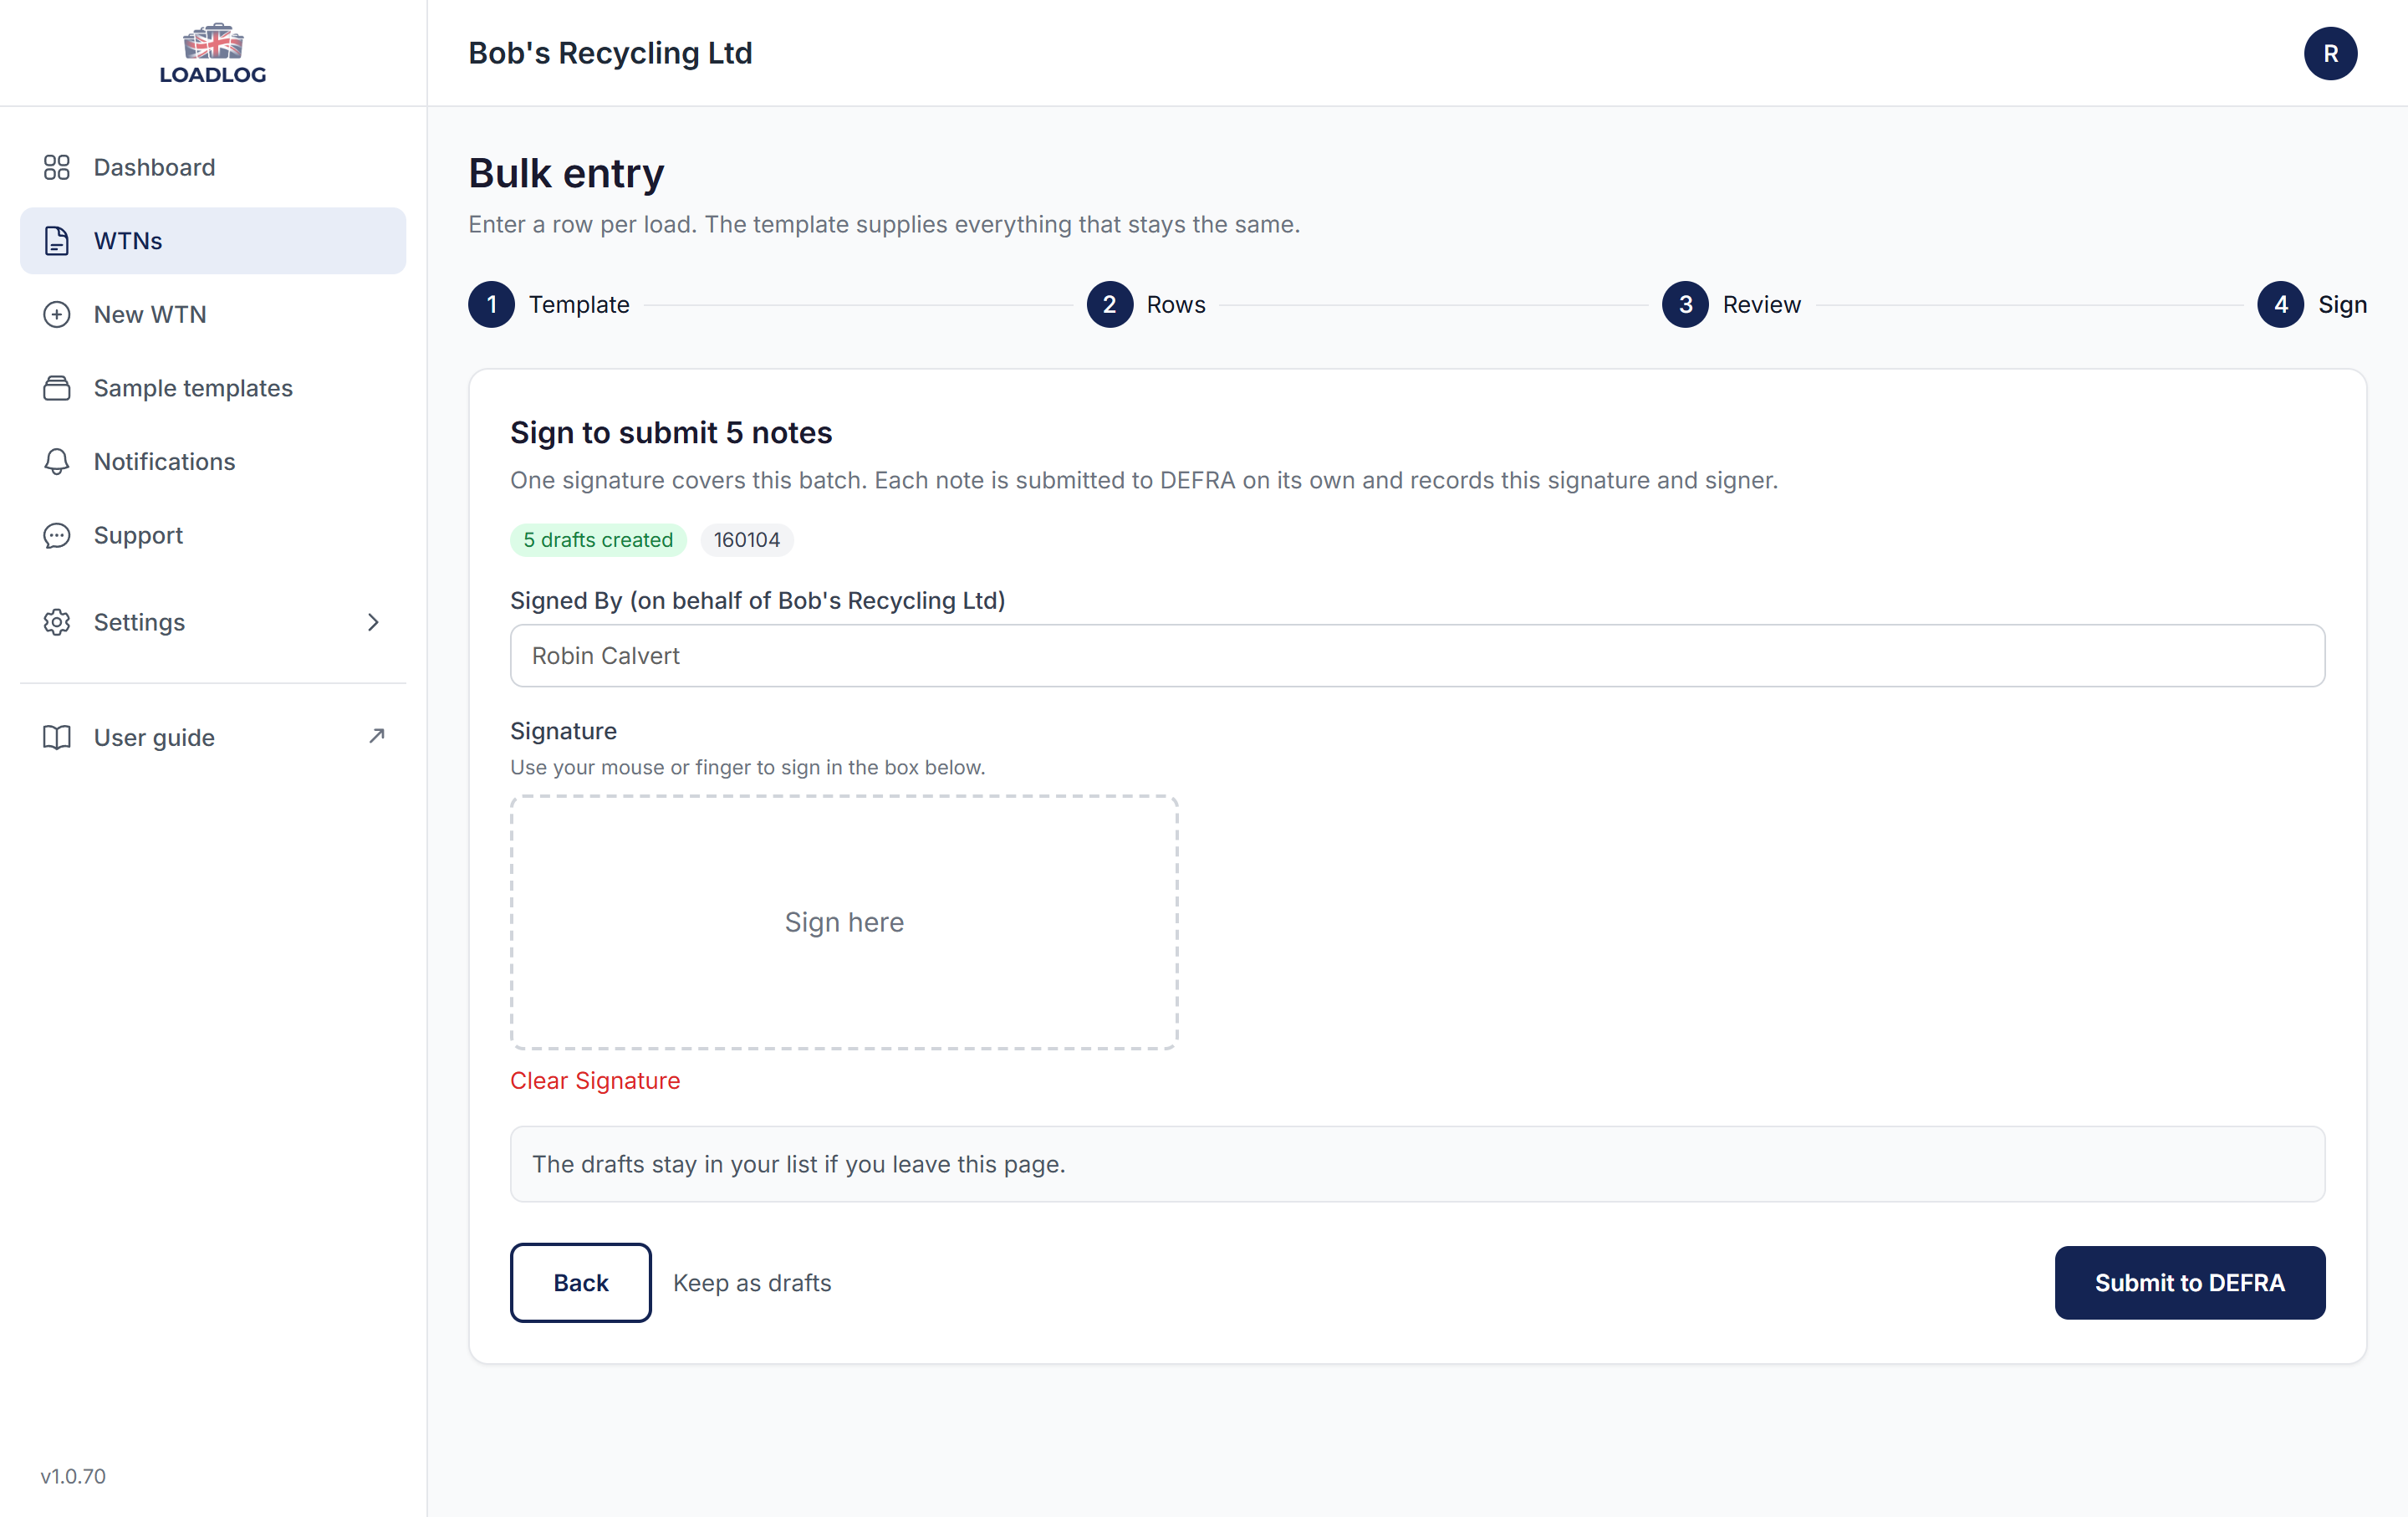
Click Finished to return to your notes. The new notes sit in your WTNs list like any others, each with its own record, PDF and audit entries. If you created drafts and want to stop there, use Keep as drafts on the signature step instead; they will be waiting for you in your WTN list.
2.12 CSV import
If the loads are already sitting in a spreadsheet or in another system, import them rather than typing them in.
- On the WTNs page, click Import.
- First time? Click Download the CSV Template under "First time? Start from the LoadLog template". It sets out the columns and gives you a row to copy. One row per waste item, and rows that share a movement reference become one note.
- Upload your file. CSV files only.
- Match your columns. The import reads your header row and lines the columns up for you. Adjust anything that looks wrong. If you import from the same system each month, you can save the mapping as a profile on that step and it will be ready for you next time.
- Check the data. This is a dry run of what will become draft notes, and nothing has been created yet. Any problem rows can be downloaded as a CSV to fix and upload again.
- Import the rows. The good rows become draft notes, and nothing has been sent to DEFRA yet.
- Sign and submit. Type the signer's name, draw the signature, and click Submit All to DEFRA. Each note is submitted on its own and records the signature, the same as bulk entry.
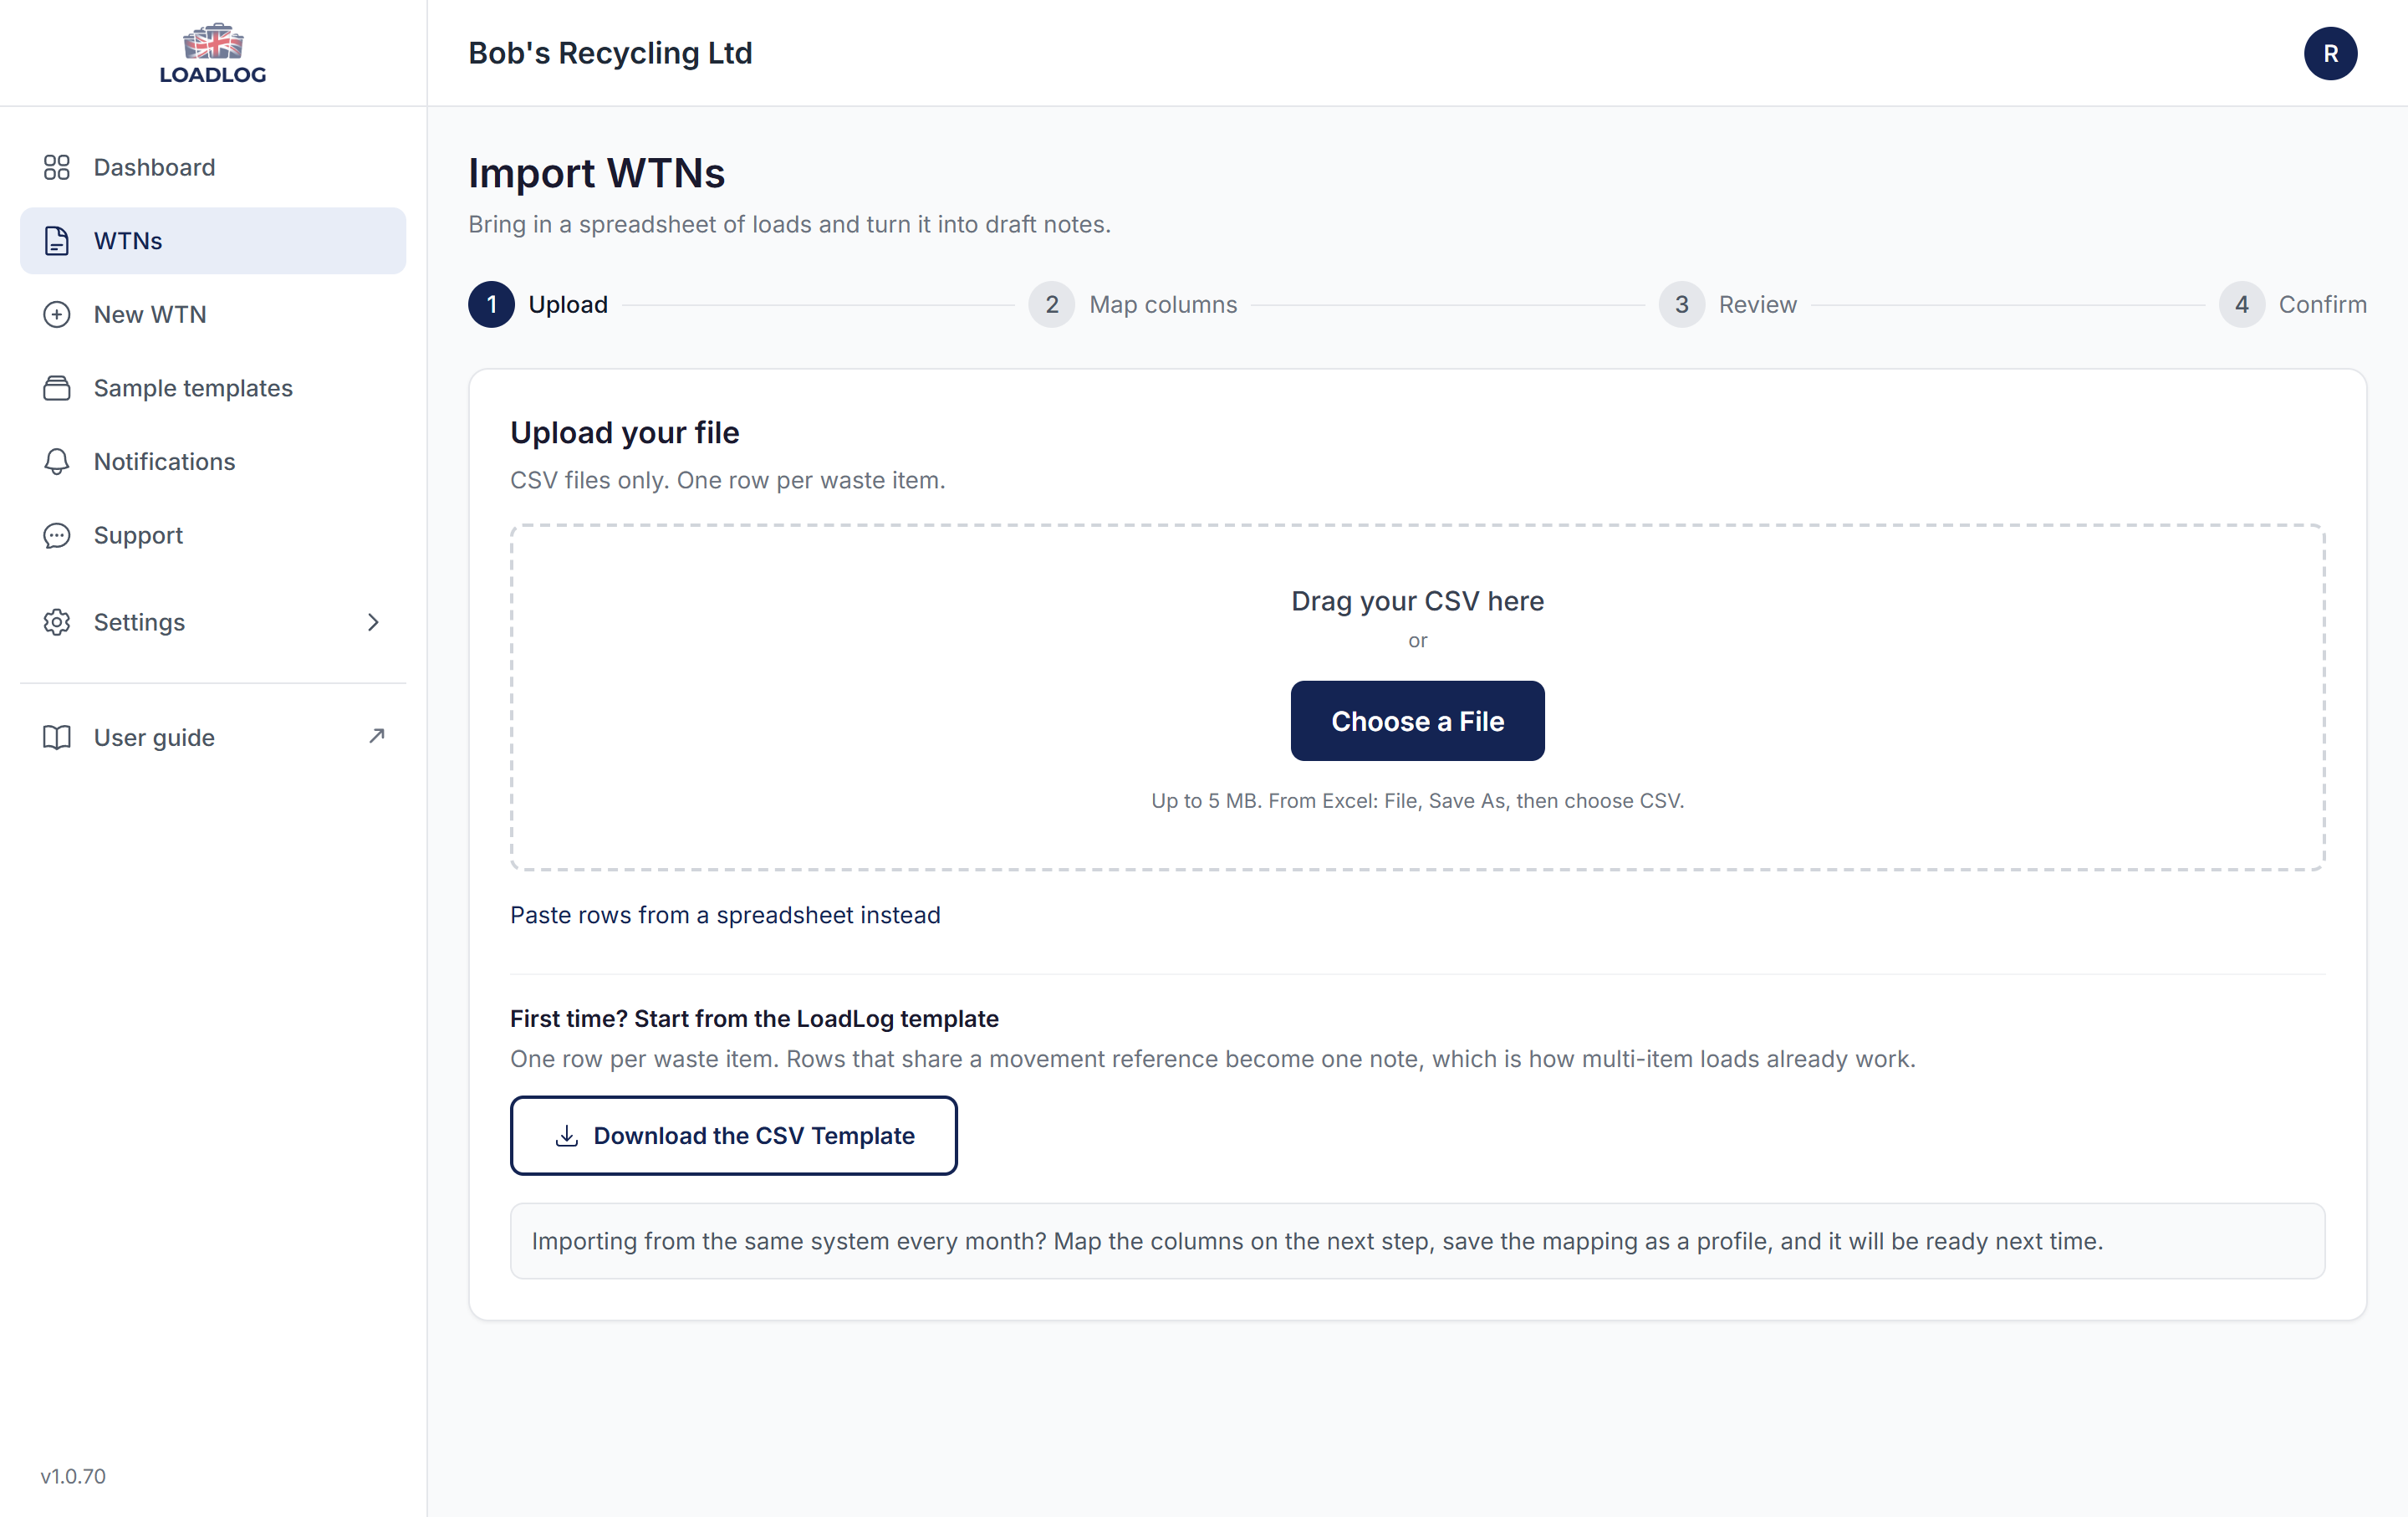
CSV imports are on paid plans and count towards the same monthly row allowance as bulk entry. If you would rather copy rows straight out of a spreadsheet, the import screen also has a Paste rows option.
If your source file needs converting before it will import, that is part of our custom data services.
2.13 Resend to production
If you tested in the sandbox before going live, the notes you sent then stay as test records. If one of those loads was real, you do not have to type it in again: open the note and click Resend to Production.
LoadLog creates a copy of the note in production, with the same details, the arrival time and the signature carried over. The copy opens on its review page, ready for you to check over and submit to DEFRA like any other note. The sandbox note keeps its reference and stays as it was, so the test record is still there if you need it.
The note page shows a link to its production copy once one exists. You can have one copy per note at a time: if you delete the copy before submitting it, the note offers the resend option again. The option only appears on notes whose submission went to the sandbox; a note sent after you went live is already a production record and needs nothing further.
2.14 Bulk edit
Bulk edit makes the same correction across a run of submitted notes in one pass. If a description was wrong on a morning's loads, or a carrier detail changed, fix them together instead of opening every note in turn.
It works on notes DEFRA has already accepted, because each change is sent as a correction against the note's own reference. Open Bulk edit from the WTNs page, beside Bulk entry and Import; the list's filters come with you, so you start from the same notes you were just looking at. Bulk edit is on paid plans, alongside Bulk entry and CSV import.
Choose the notes
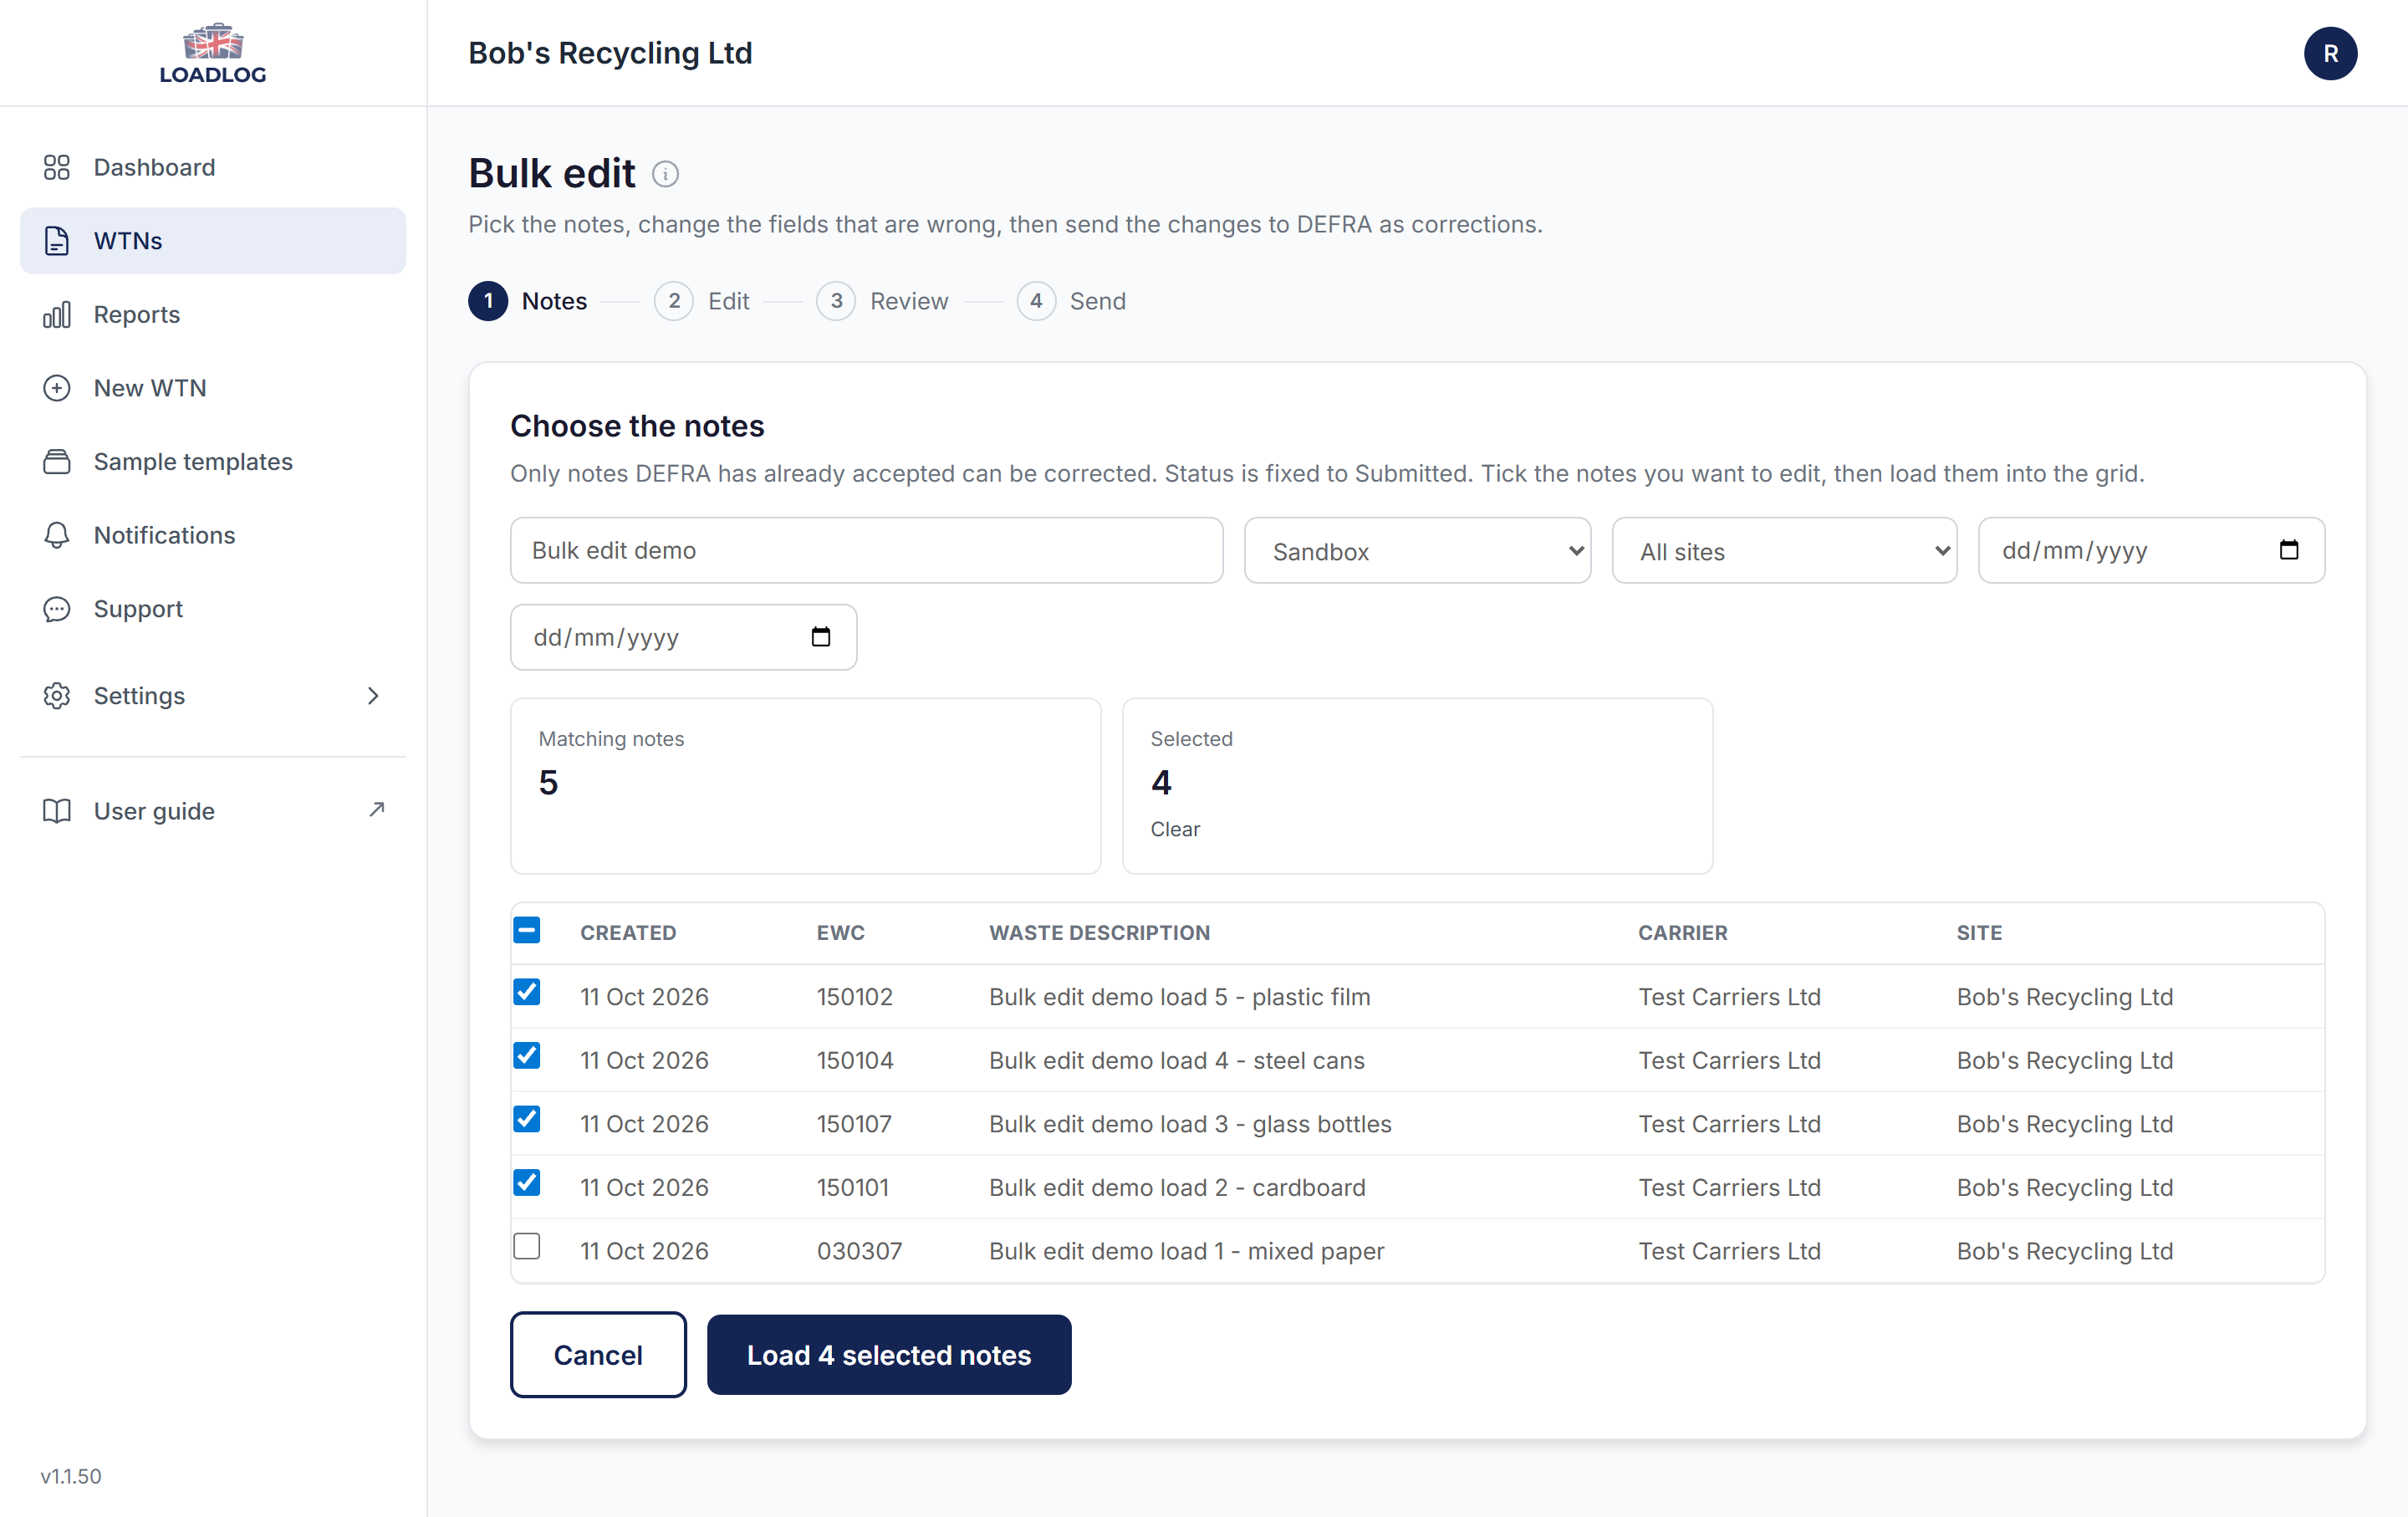
Tick the notes to correct. The search box takes an EWC code, a carrier or words from the description, and the date boxes narrow the list to a period. The header tick selects everything in the current list, and a batch can hold up to 250 notes. The Matching notes and Selected counters follow along as you go. When the selection looks right, click Load selected notes to bring them into the grid; the button counts what you have ticked.
Edit the rows
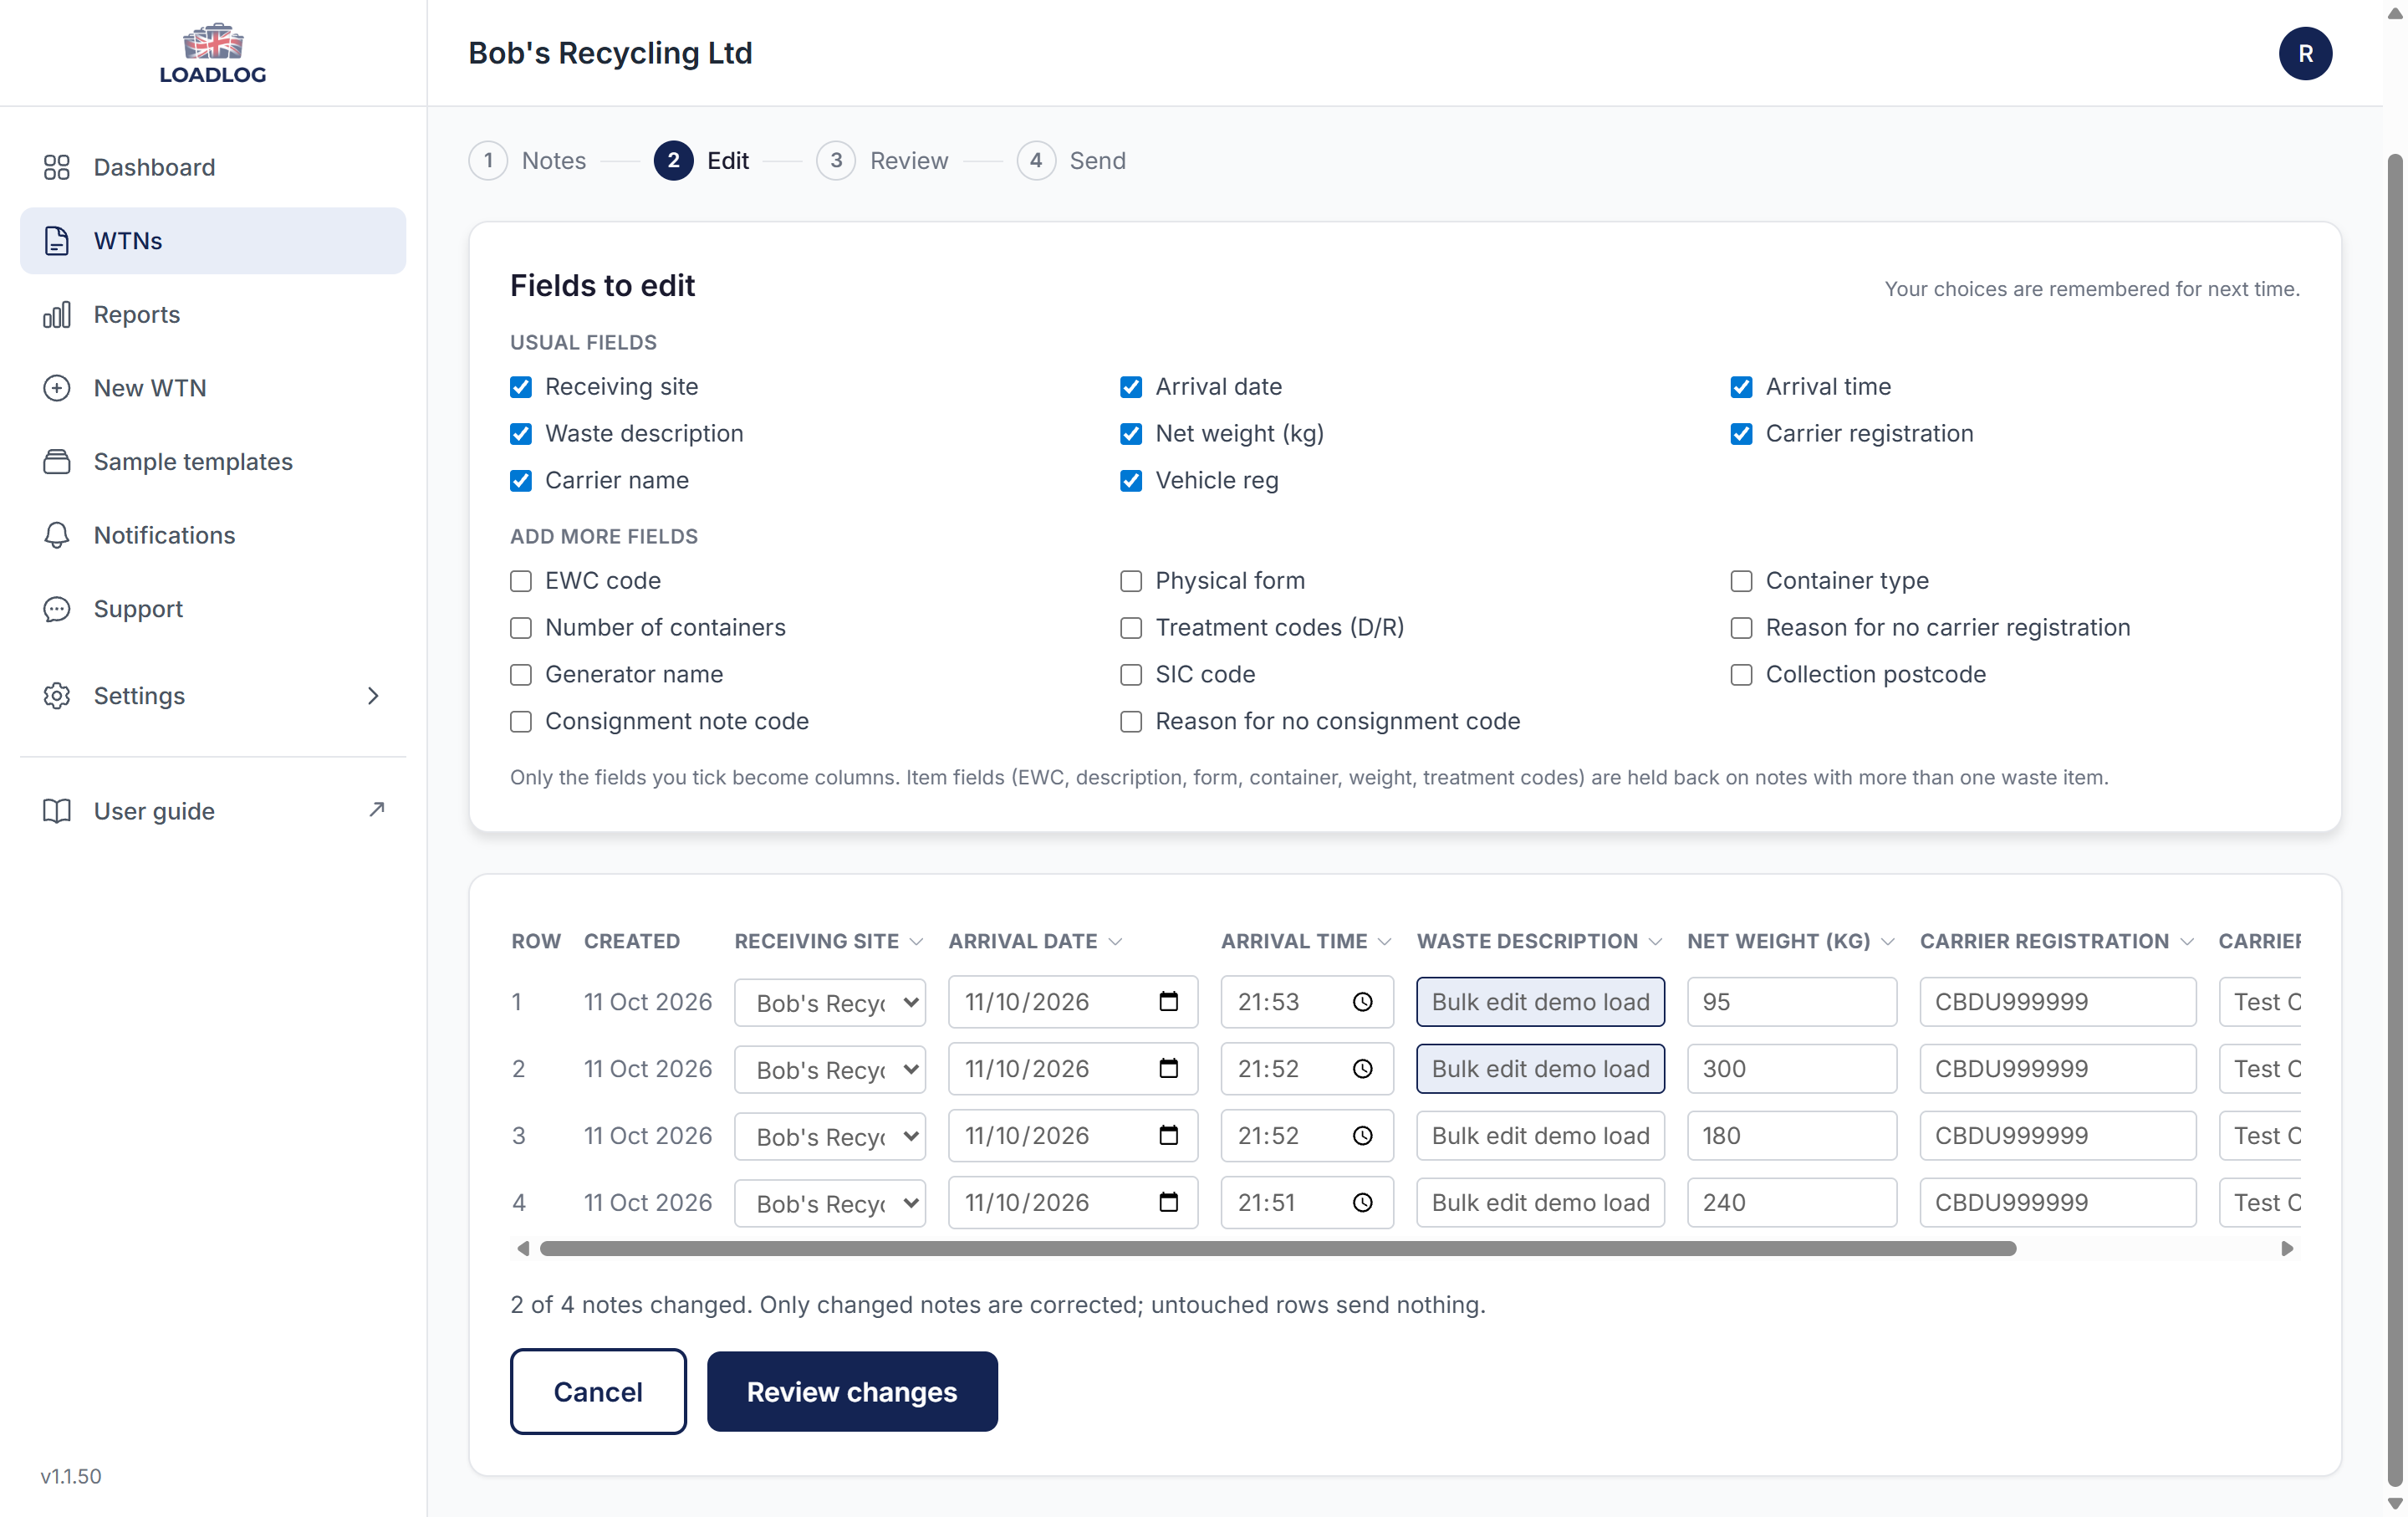
Only the fields you tick become columns: the usual fields are ticked for you, and EWC code, treatment codes and the rest sit under Add more fields. Your choices are remembered for next time. Type the new value into any cell, paste a column in from a spreadsheet, or use the arrow beside a column heading to copy the first row's value down to the others. Changed cells are tinted as you type, so you can see the fix before anything is sent. Item fields are held back on notes with more than one waste item: those cells stay greyed out, and the note is called out on the next step. When the grid is ready, click Review changes.
Review and send
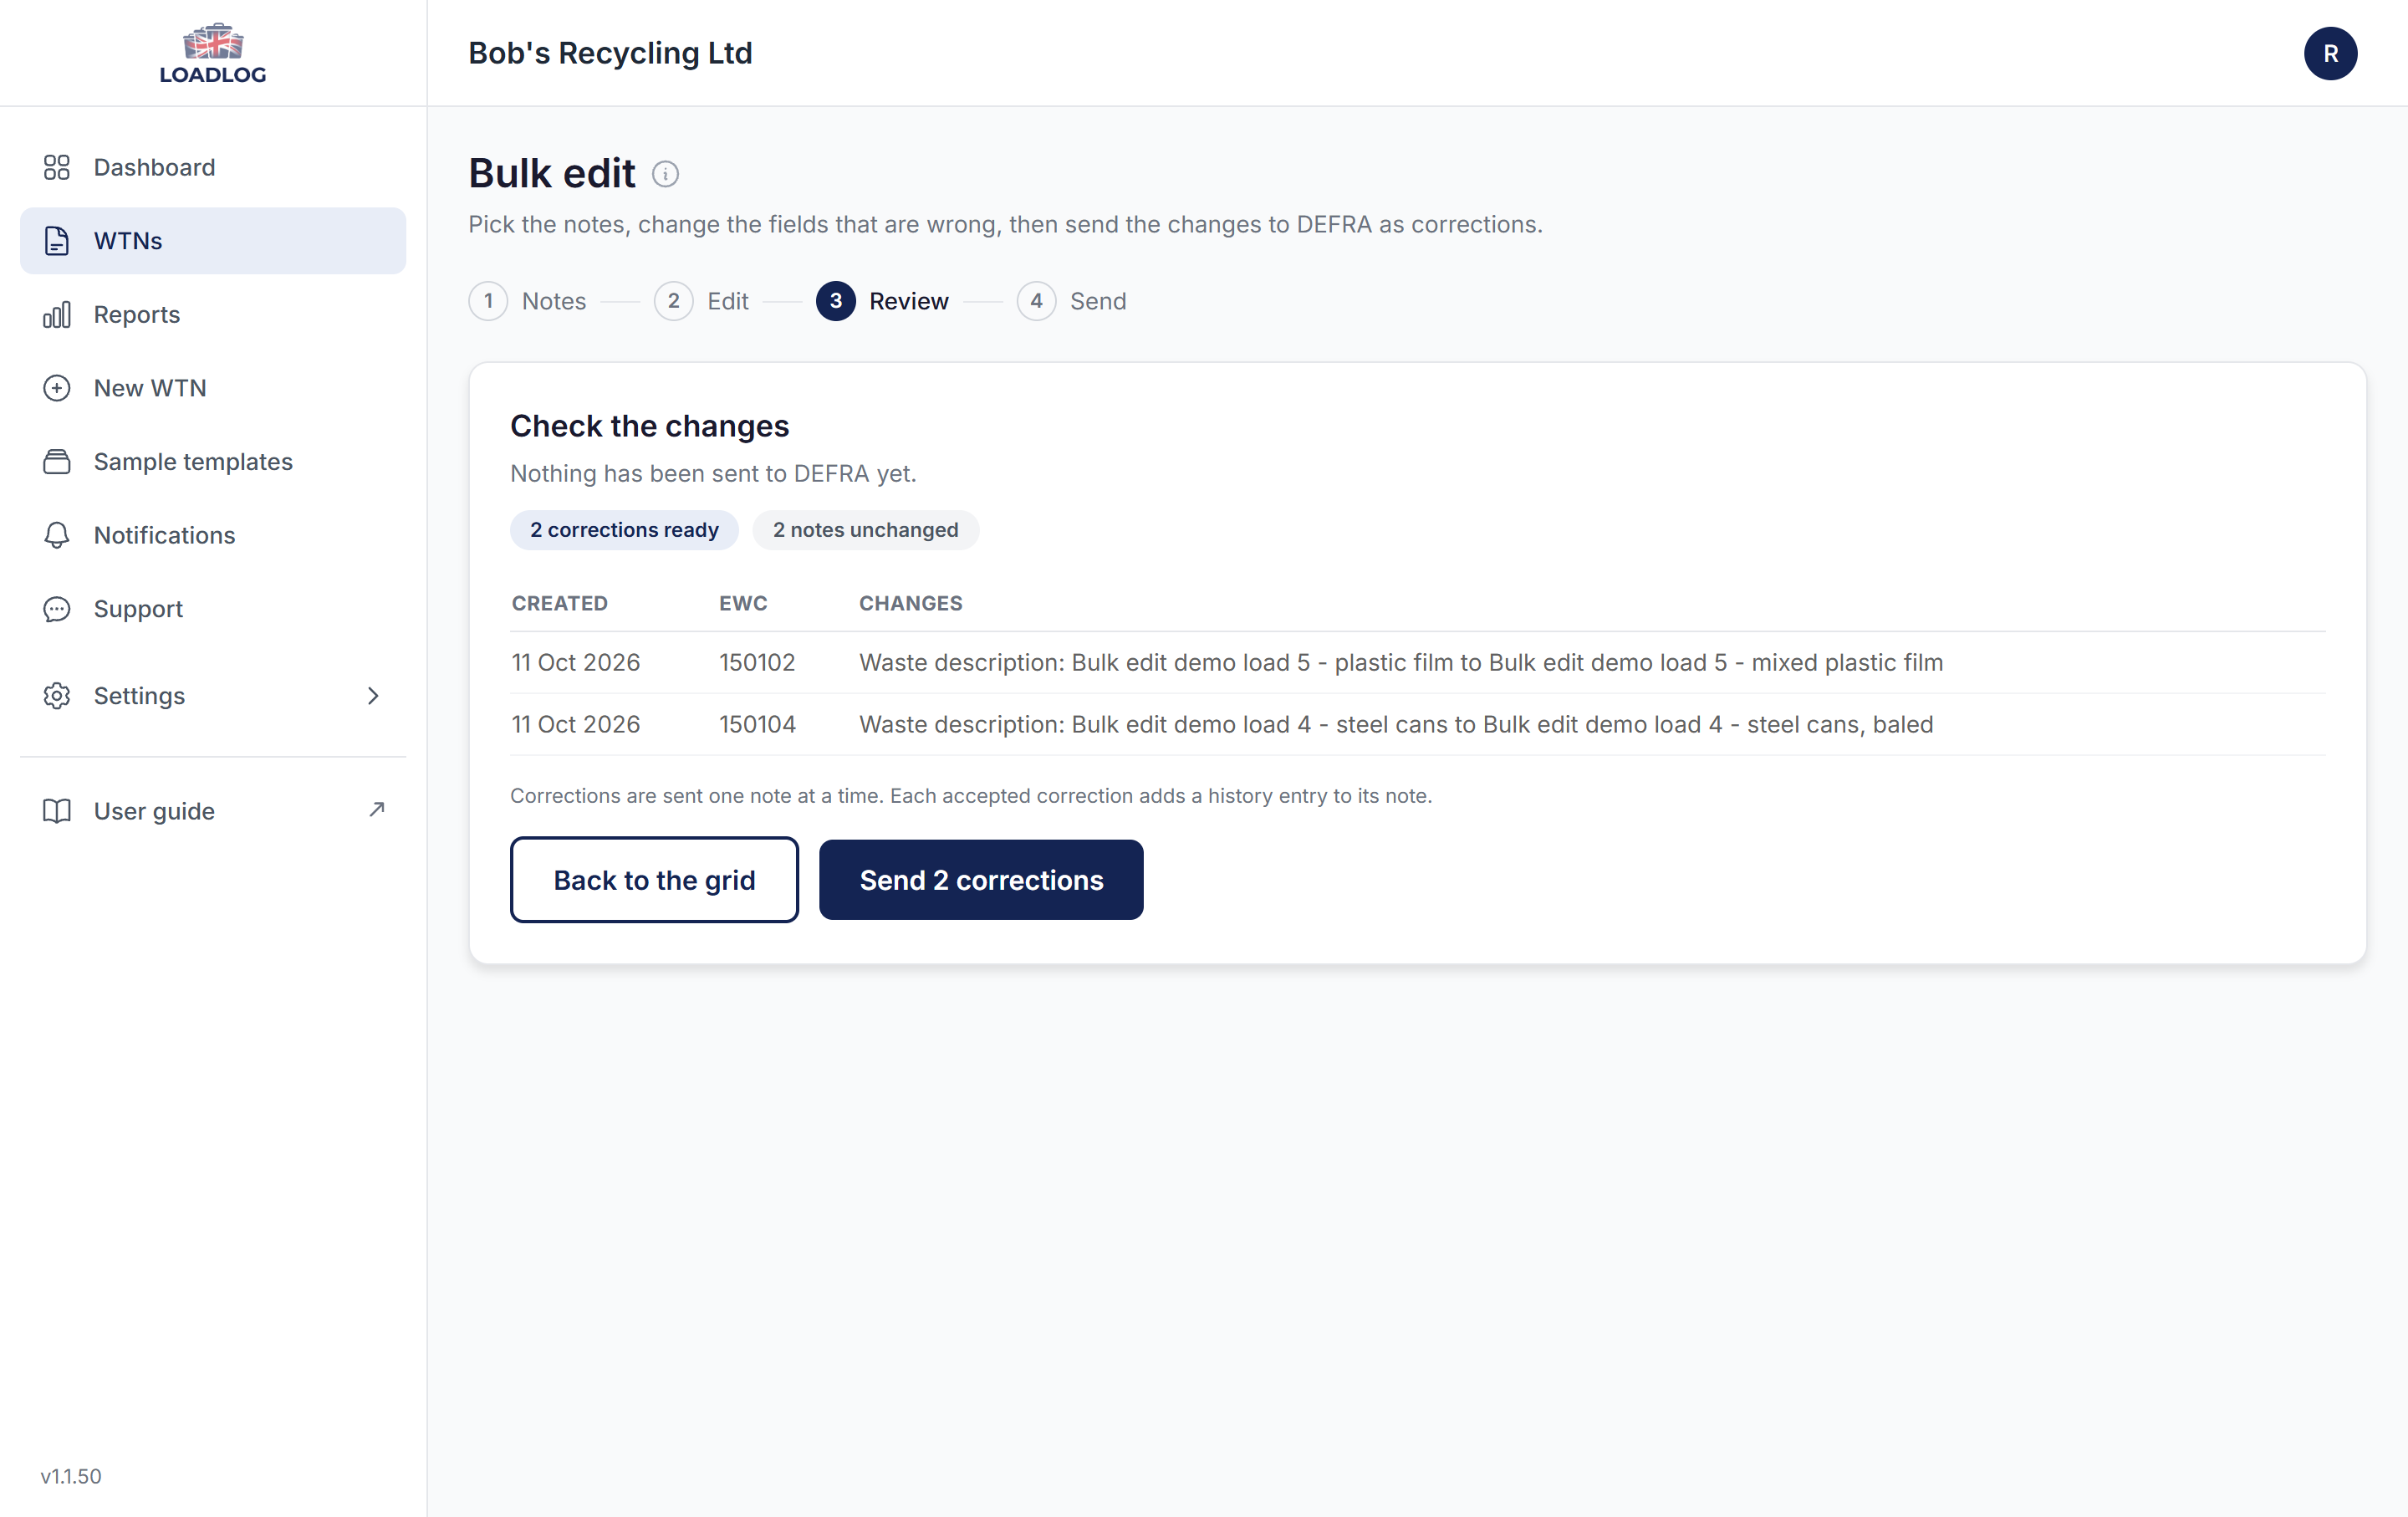
The Review step lists every change note by note, with the old value and the new one. Nothing has been sent yet, and notes you left untouched send nothing. When it looks right, click Send N corrections; the button counts the notes it will correct. The corrections are sent to DEFRA one note at a time, so keep this tab open until they finish. Each accepted correction updates the note's history and its PDF straight away. A refusal leaves the note exactly as it was, and you can retry it from the same step. No new signature is needed: the note keeps the signature it was submitted with.
3. The carrier hub
The carrier hub keeps the compliance records for the part of the business that carries waste: the permit or exemption, the people with competence, the drivers and their numbers, the vehicles, and the documents for all of it. It sits on the same account as your site, and setting it up costs nothing.
You do not need the hub to record notes. Turn it on if you also carry waste, or if you want driver numbers and the inspection pack for your own vehicles. Section 4 covers Incoming carriers, the list of carriers that deliver to your site.
3.1 Turn on the carrier side
If you signed up as a Carrier, or as Waste site and carrier, the hub is already on and appears in the main menu.
If you signed up as a waste site, open Settings, then Organisation. Under What do you want to manage? choose Waste site and carrier and click Add the carrier side. Pick your carrier type (Carrier, Broker, Dealer, or Carrier, broker or dealer), then click Set up the carrier hub. Your organisation details carry over, and your sites, plan and records are untouched.
Drivers and vehicles are tracked for a carrier and for a combined business. A broker or a dealer can switch tracking off if they do not run vehicles.
3.2 Overview
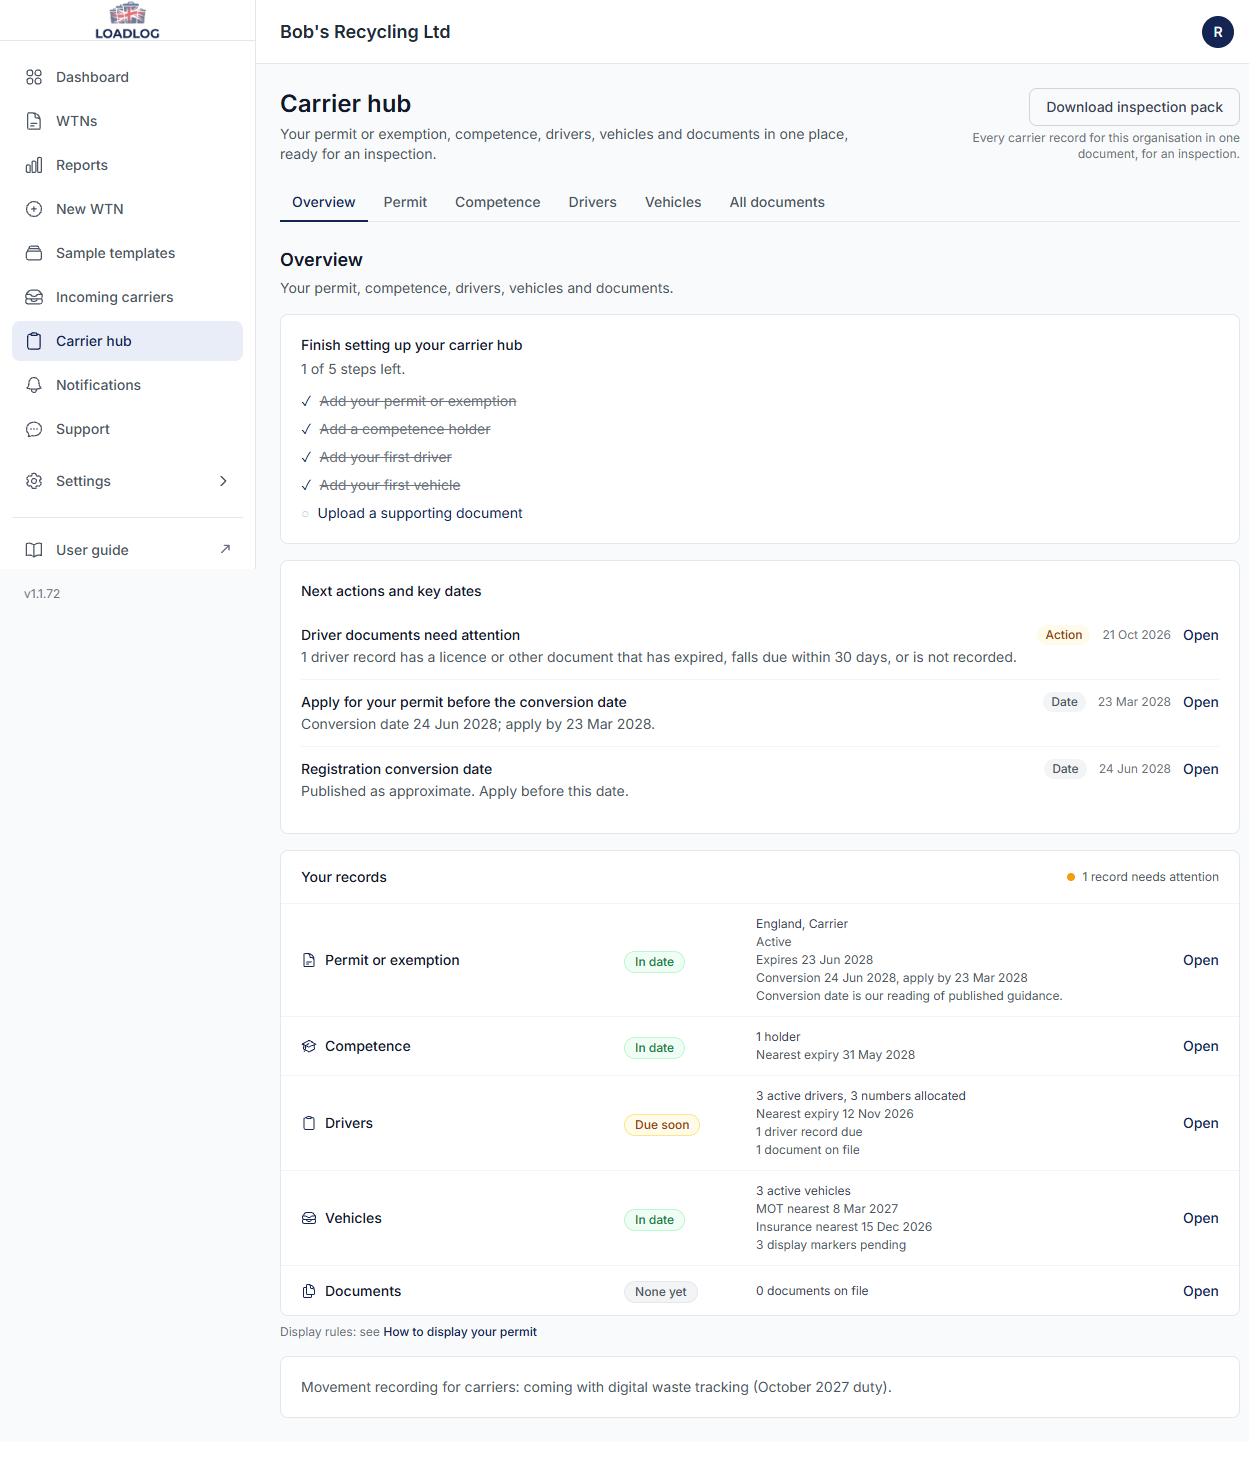
The overview is the first page of the hub. It shows the next date that matters, what is missing, and a short checklist for the setup: a permit, a competence holder, the first driver and the first vehicle. As you add records the checklist clears, and the page becomes a working summary of the business.
The inspection pack download sits on this page as well. Section 3.7 covers what it contains.
3.3 Permit or exemption
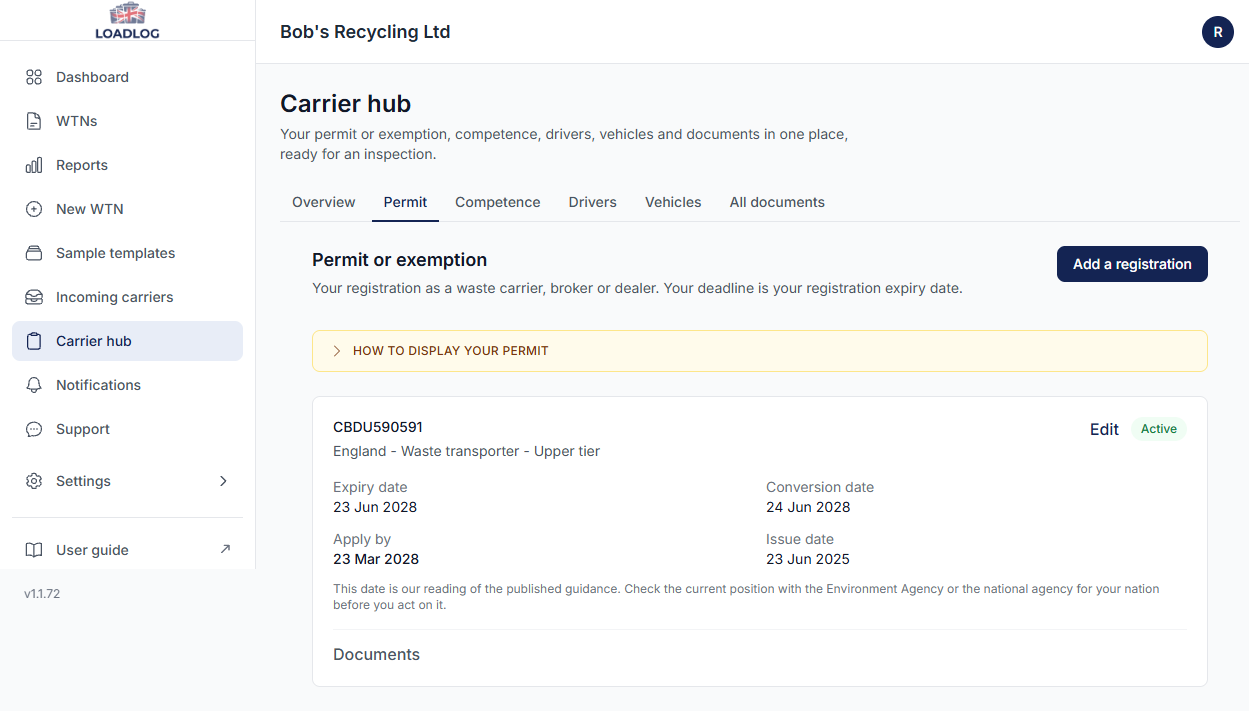
Open Permit or exemption and click Add a registration. Type the number, or search by business name or company number. LoadLog checks the four public registers (England, Wales, Scotland and Northern Ireland) and fills in the nation, the registration type, the tier and the dates from the match. The registers refresh every night, and the record shows when it was last checked.
England is the nation where registration becomes a permit. From 22 July 2027 a registration converts to a permit or a registered exemption, and most convert on the day after their own expiry date, so the change reaches each business at a different time. Lower-tier registrations often move to a registered exemption rather than a permit. The record shows the conversion date and the date to apply by, and the reminders follow both.
Attach the certificate or notice to the record. The display panel is a checklist for what to show on a vehicle, not a statement of current law: the Environment Agency has not set the standard rules for displaying a permit yet, so use the panel to get the vehicle ready and check the rules before you rely on it.
3.4 Competence
Competence is the technical certificate behind the business. Open Competence and add a holder: their name, the scheme, the certificate reference, the valid from and valid to dates, and the certificate itself.
The schemes are CIWM (WAMITAB) operator competence, CIWM Controllers and Transporters (CaT), and Other. Choose Other when the certificate comes from a different route, and type its name in the box that appears.
If you applied in the first year and the certificate has not arrived, tick In the first-year window. The record then gives you until 22 July 2028 and says why, instead of showing the certificate as overdue.
3.5 Drivers
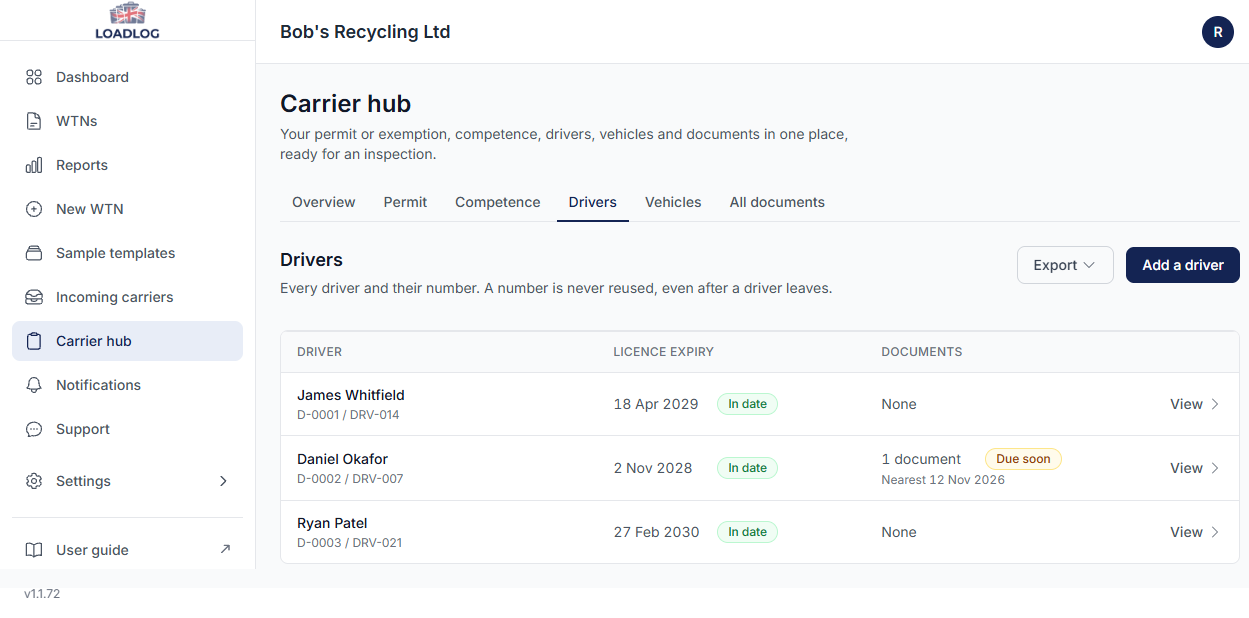
Every driver needs a number from 22 July 2027, and the hub is the record of who has which. Open Drivers and add a driver: their name, their licence expiry and their number. LoadLog allocates the next number, or you can type one you already use. A number is never reused, even after a driver leaves.
Add a CPC card, tachograph card or ADR certificate against the driver, with its expiry. The hub flags a document 30 days before it lapses.
Two exports sit on the page. Roadside CSV is the list for the cab: names and numbers. The full driver register CSV adds licence expiry and a document summary for the office. Every export is written to the audit log.
3.6 Vehicles and documents
Open Vehicles and type the plate, then click Look up. LoadLog reads DVSA's MOT history service and fills in the make, model, first registration and MOT expiry, and keeps the test history, mileage and defects on the vehicle's record. Insurance is entered by hand, because there is no public register for it: add the expiry date and attach the certificate in All documents.
All documents is the single list of every file on the hub, each linked to the record it belongs to. Use it when you are looking for a certificate rather than a vehicle or a driver.
3.7 Inspection pack, exports and reminders
The inspection pack is one PDF: the permit, the drivers and their numbers, the competence holders and the vehicles. Administrators can download it from the overview, or from Reports. Every export is recorded in the audit log, so you can show when a pack was produced.
Reminders go to the active administrators on the account at 07:00 UK time. Registration expiry and competence certificates, 30 days before. The date to apply by, four months and three months before. A conversion, 60 days before. Driver documents and vehicle insurance, 30 days before. The two document reminders start switched off.
To change them, or to pause all of them with one switch: Settings, then Email Preferences, then Carrier reminders.
4. Incoming carriers
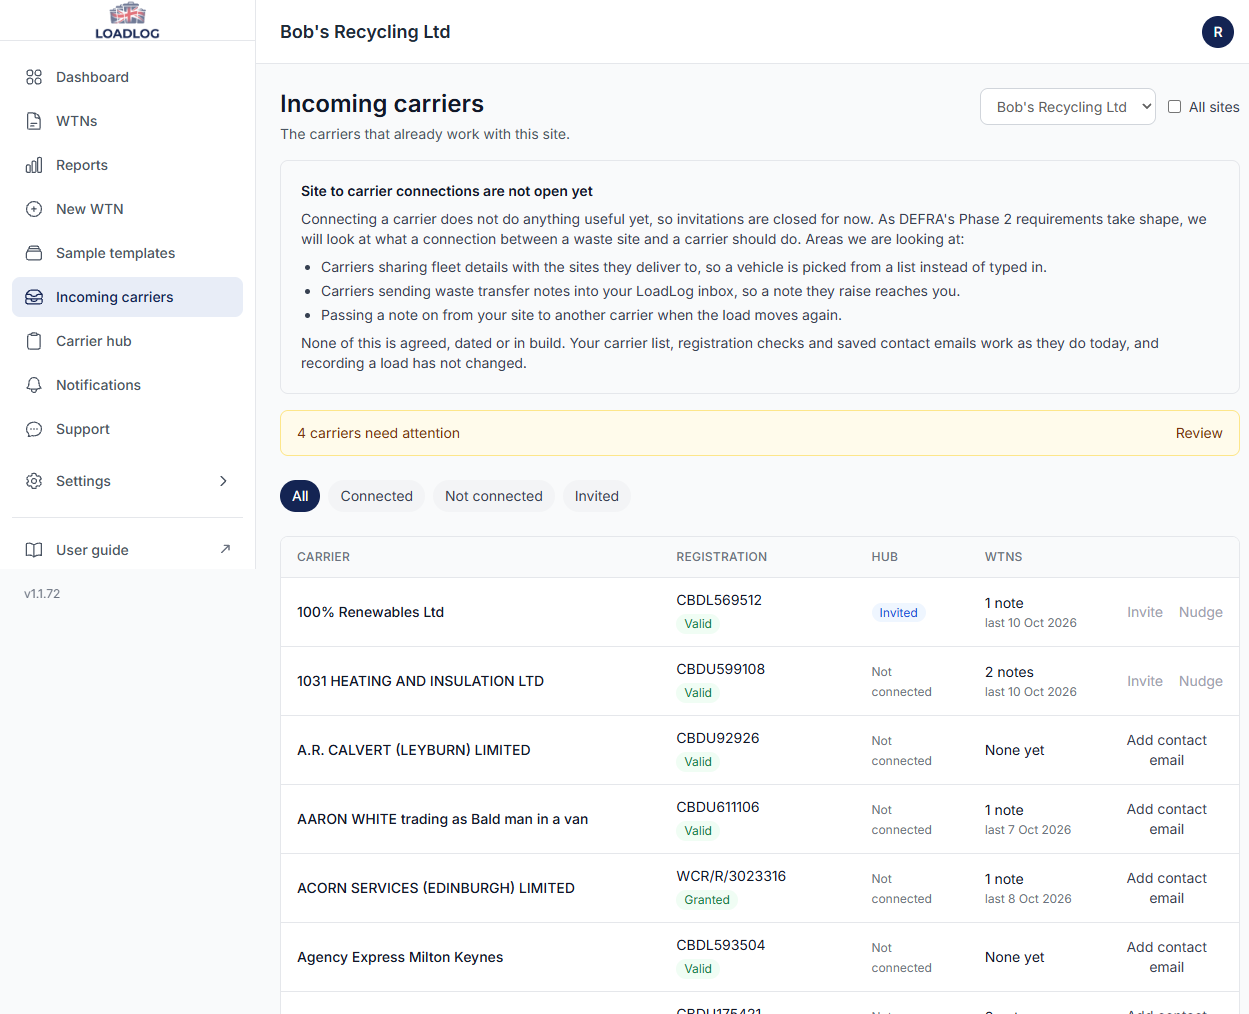
Incoming carriers is the site side. It shows the carriers that already work with you, and what the public registers say about each one.
4.1 The list and the register check
The list is built from the carrier names on your notes, your saved carriers and your recent lookups. Choose a site from the selector, or tick All sites to see every site at once. The filters above the table switch between all carriers, connected, not connected and invited.
Each row shows the carrier, the registration we hold, the link state and a count of the notes they have brought in. Status is checked against the public registers we hold: the Environment Agency, Natural Resources Wales, SEPA and NIEA. Not on the register we hold means no match was found for that number, and it does not mean the carrier is unregistered. The date under the status is when we last checked, and the registers refresh every night.
Select a carrier to see the record we hold: business name, nation, tier, expiry, when the register was last checked, and the notes they have brought in.
4.2 Needs attention
Needs attention collects the carriers that need a look: no registration number on file, a number that has expired, or a number that is not on the register we hold. Open a carrier to add the missing number, or use the saved contact email to ask for it.
The list is a prompt to check, not a compliance decision. It does not replace the carrier's own records.
4.3 Connections, for now
Connecting a carrier does not do anything useful yet, so invitations are closed. The link column shows Not connected for most carriers, and Invited or Connected where a link already exists.
As Phase 2 takes shape we will look at carriers sharing fleet details, carriers sending notes into your inbox, and passing a note on when the load moves again. None of it is agreed, dated or in build.
Your carrier list, the register checks and the saved contact emails work today.
5. Reporting
Everything you need for your own records and for an Environment Agency inspection is available from the Reports page, your WTNs list and the Audit Log. The ready-made reports pull the figures together for you, and the WTNs list and the Audit Log hold the detail underneath.
5.1 Ready-made reports
Open Reports from the sidebar for a library of ready-made reports. Each one gathers the records you already have and presents the figures you need, and running one never changes anything. Every card tells you in a line what its report covers. Open the one you need.
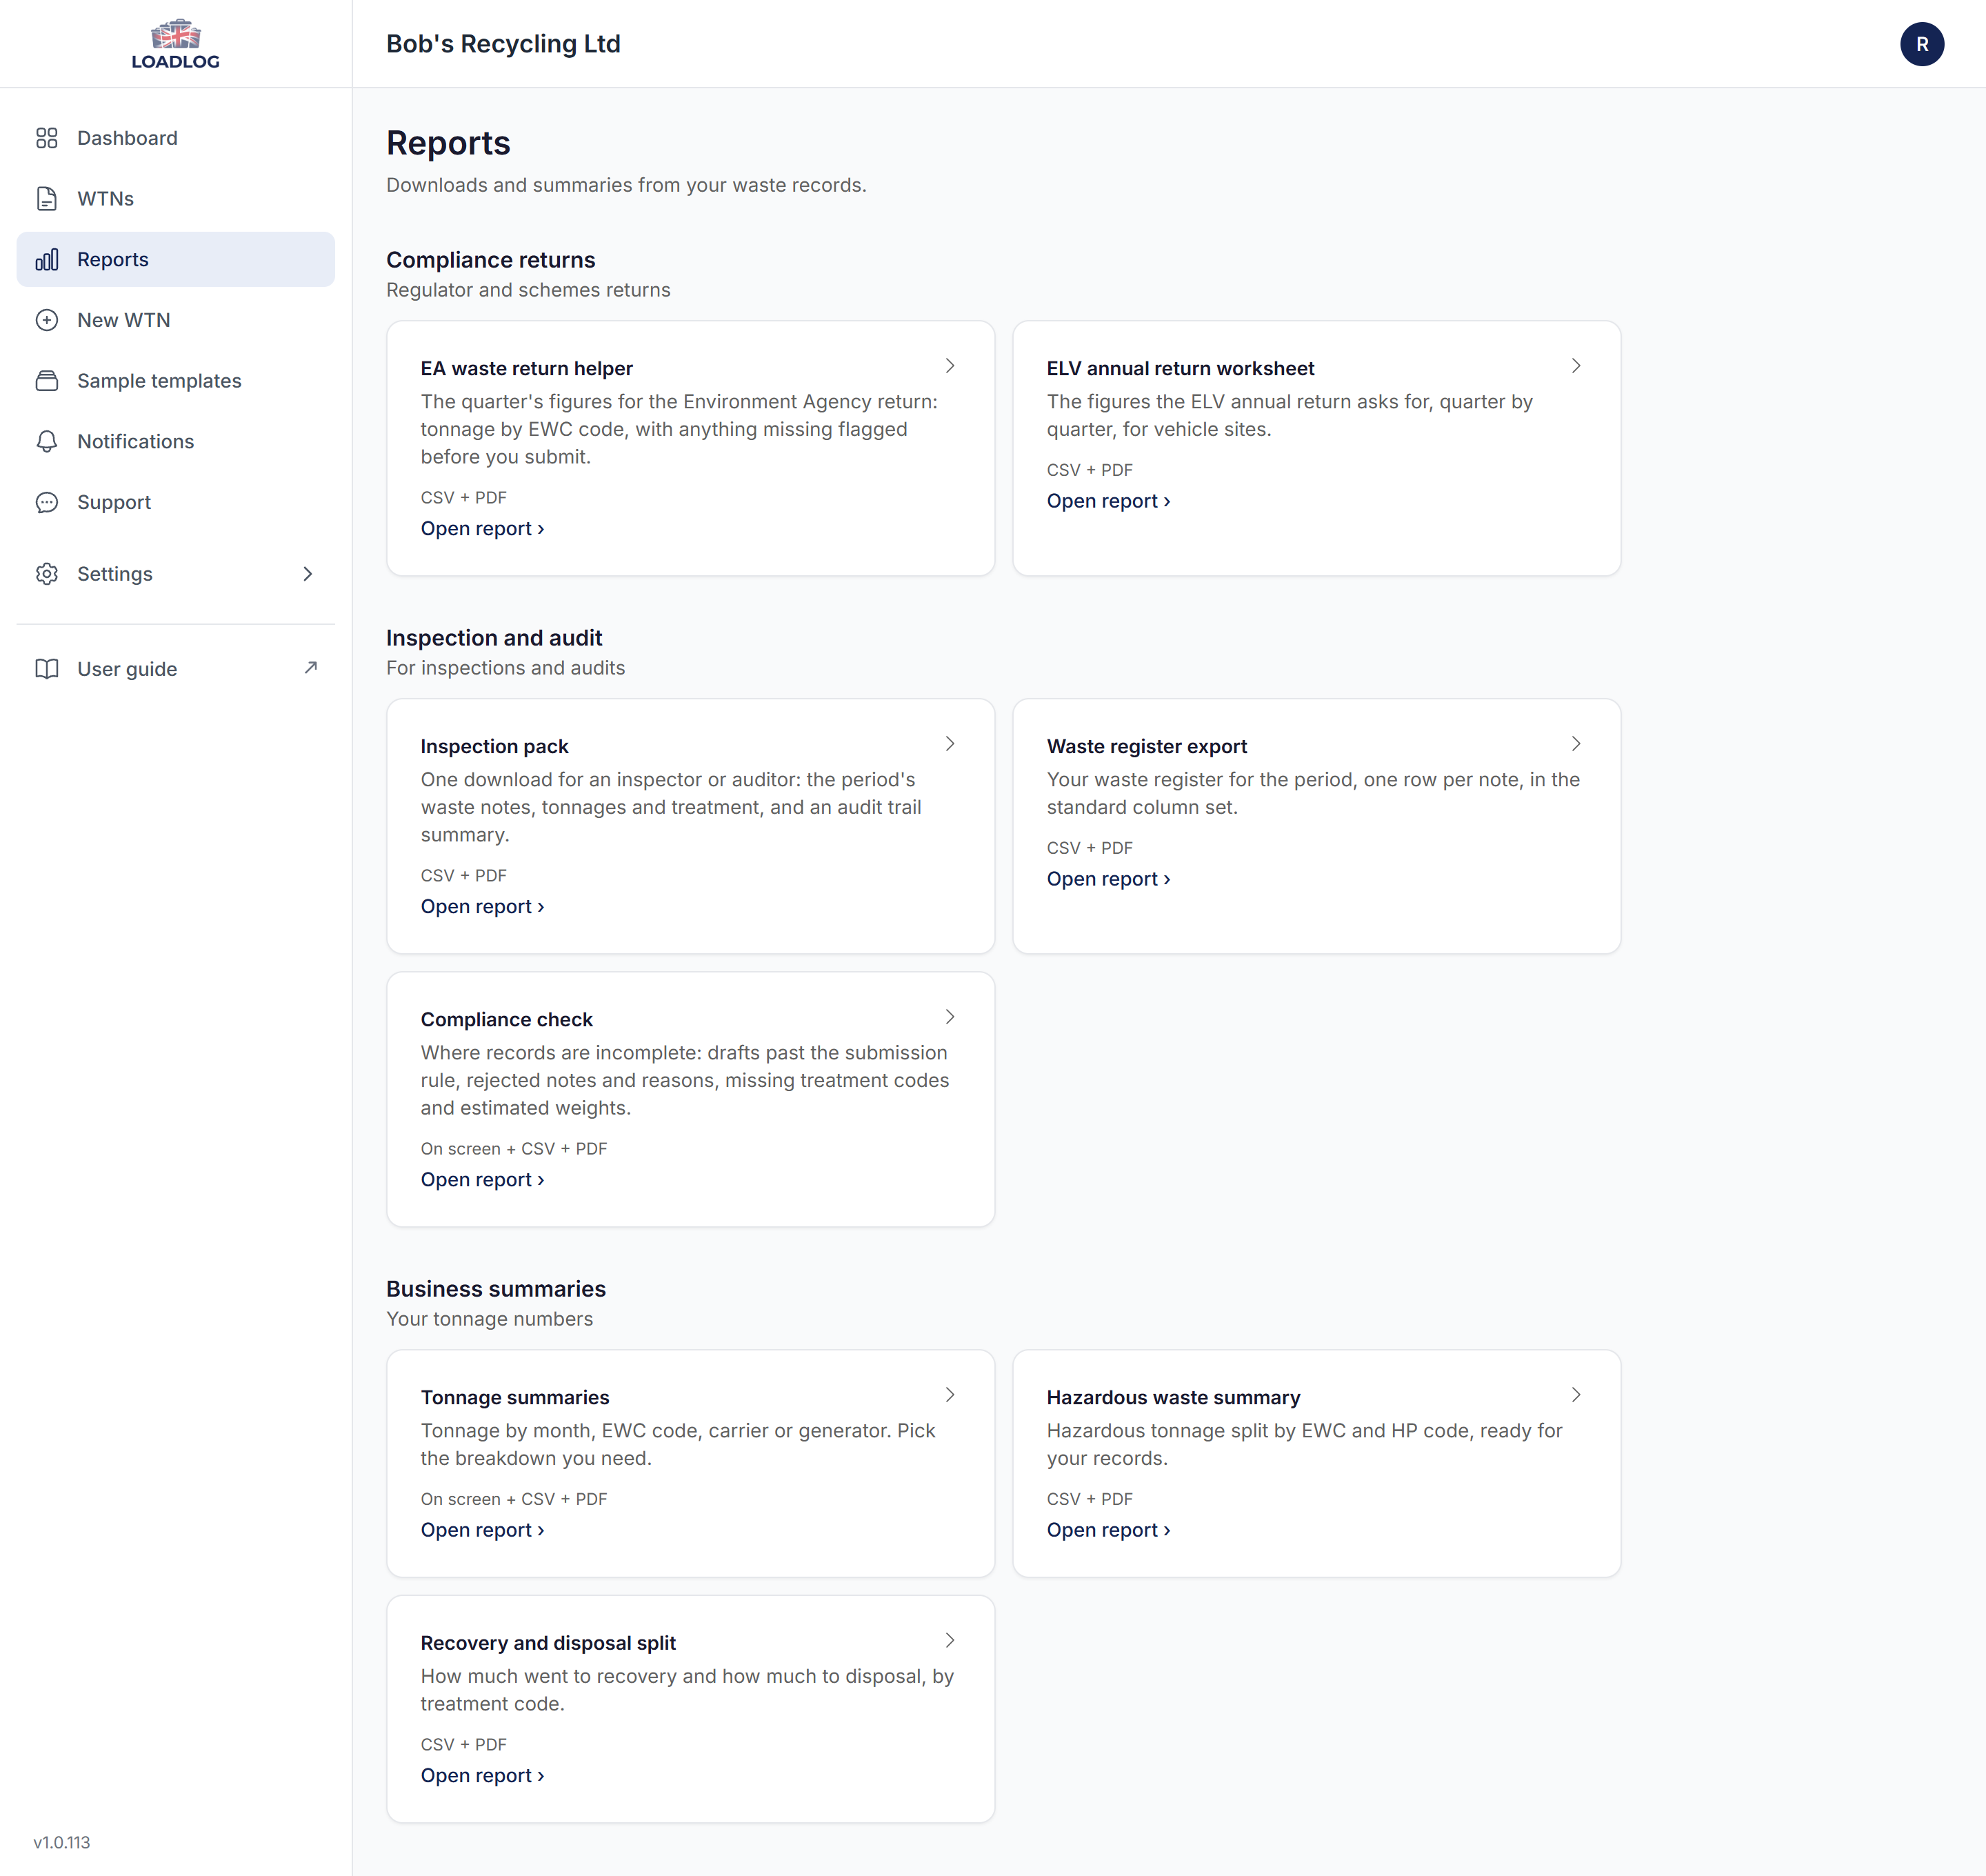
Set the period you want with the From and To dates, and choose the environment: production for your real loads, sandbox for test ones. The report updates as you change either, and the figures come from the notes in your WTNs list.
If you run more than one site, the Sites row on a report filters the figures to the sites you tick. See section 1.6.
Some reports offer more than one view of the same figures, and you can switch between views without setting your dates again. Long tables are split into pages on screen so they stay readable, and the page tells you how many rows there are in total. Click any row to open the notes behind the figure, each with a link to the note itself. It is the quickest way to check a number that looks wrong.
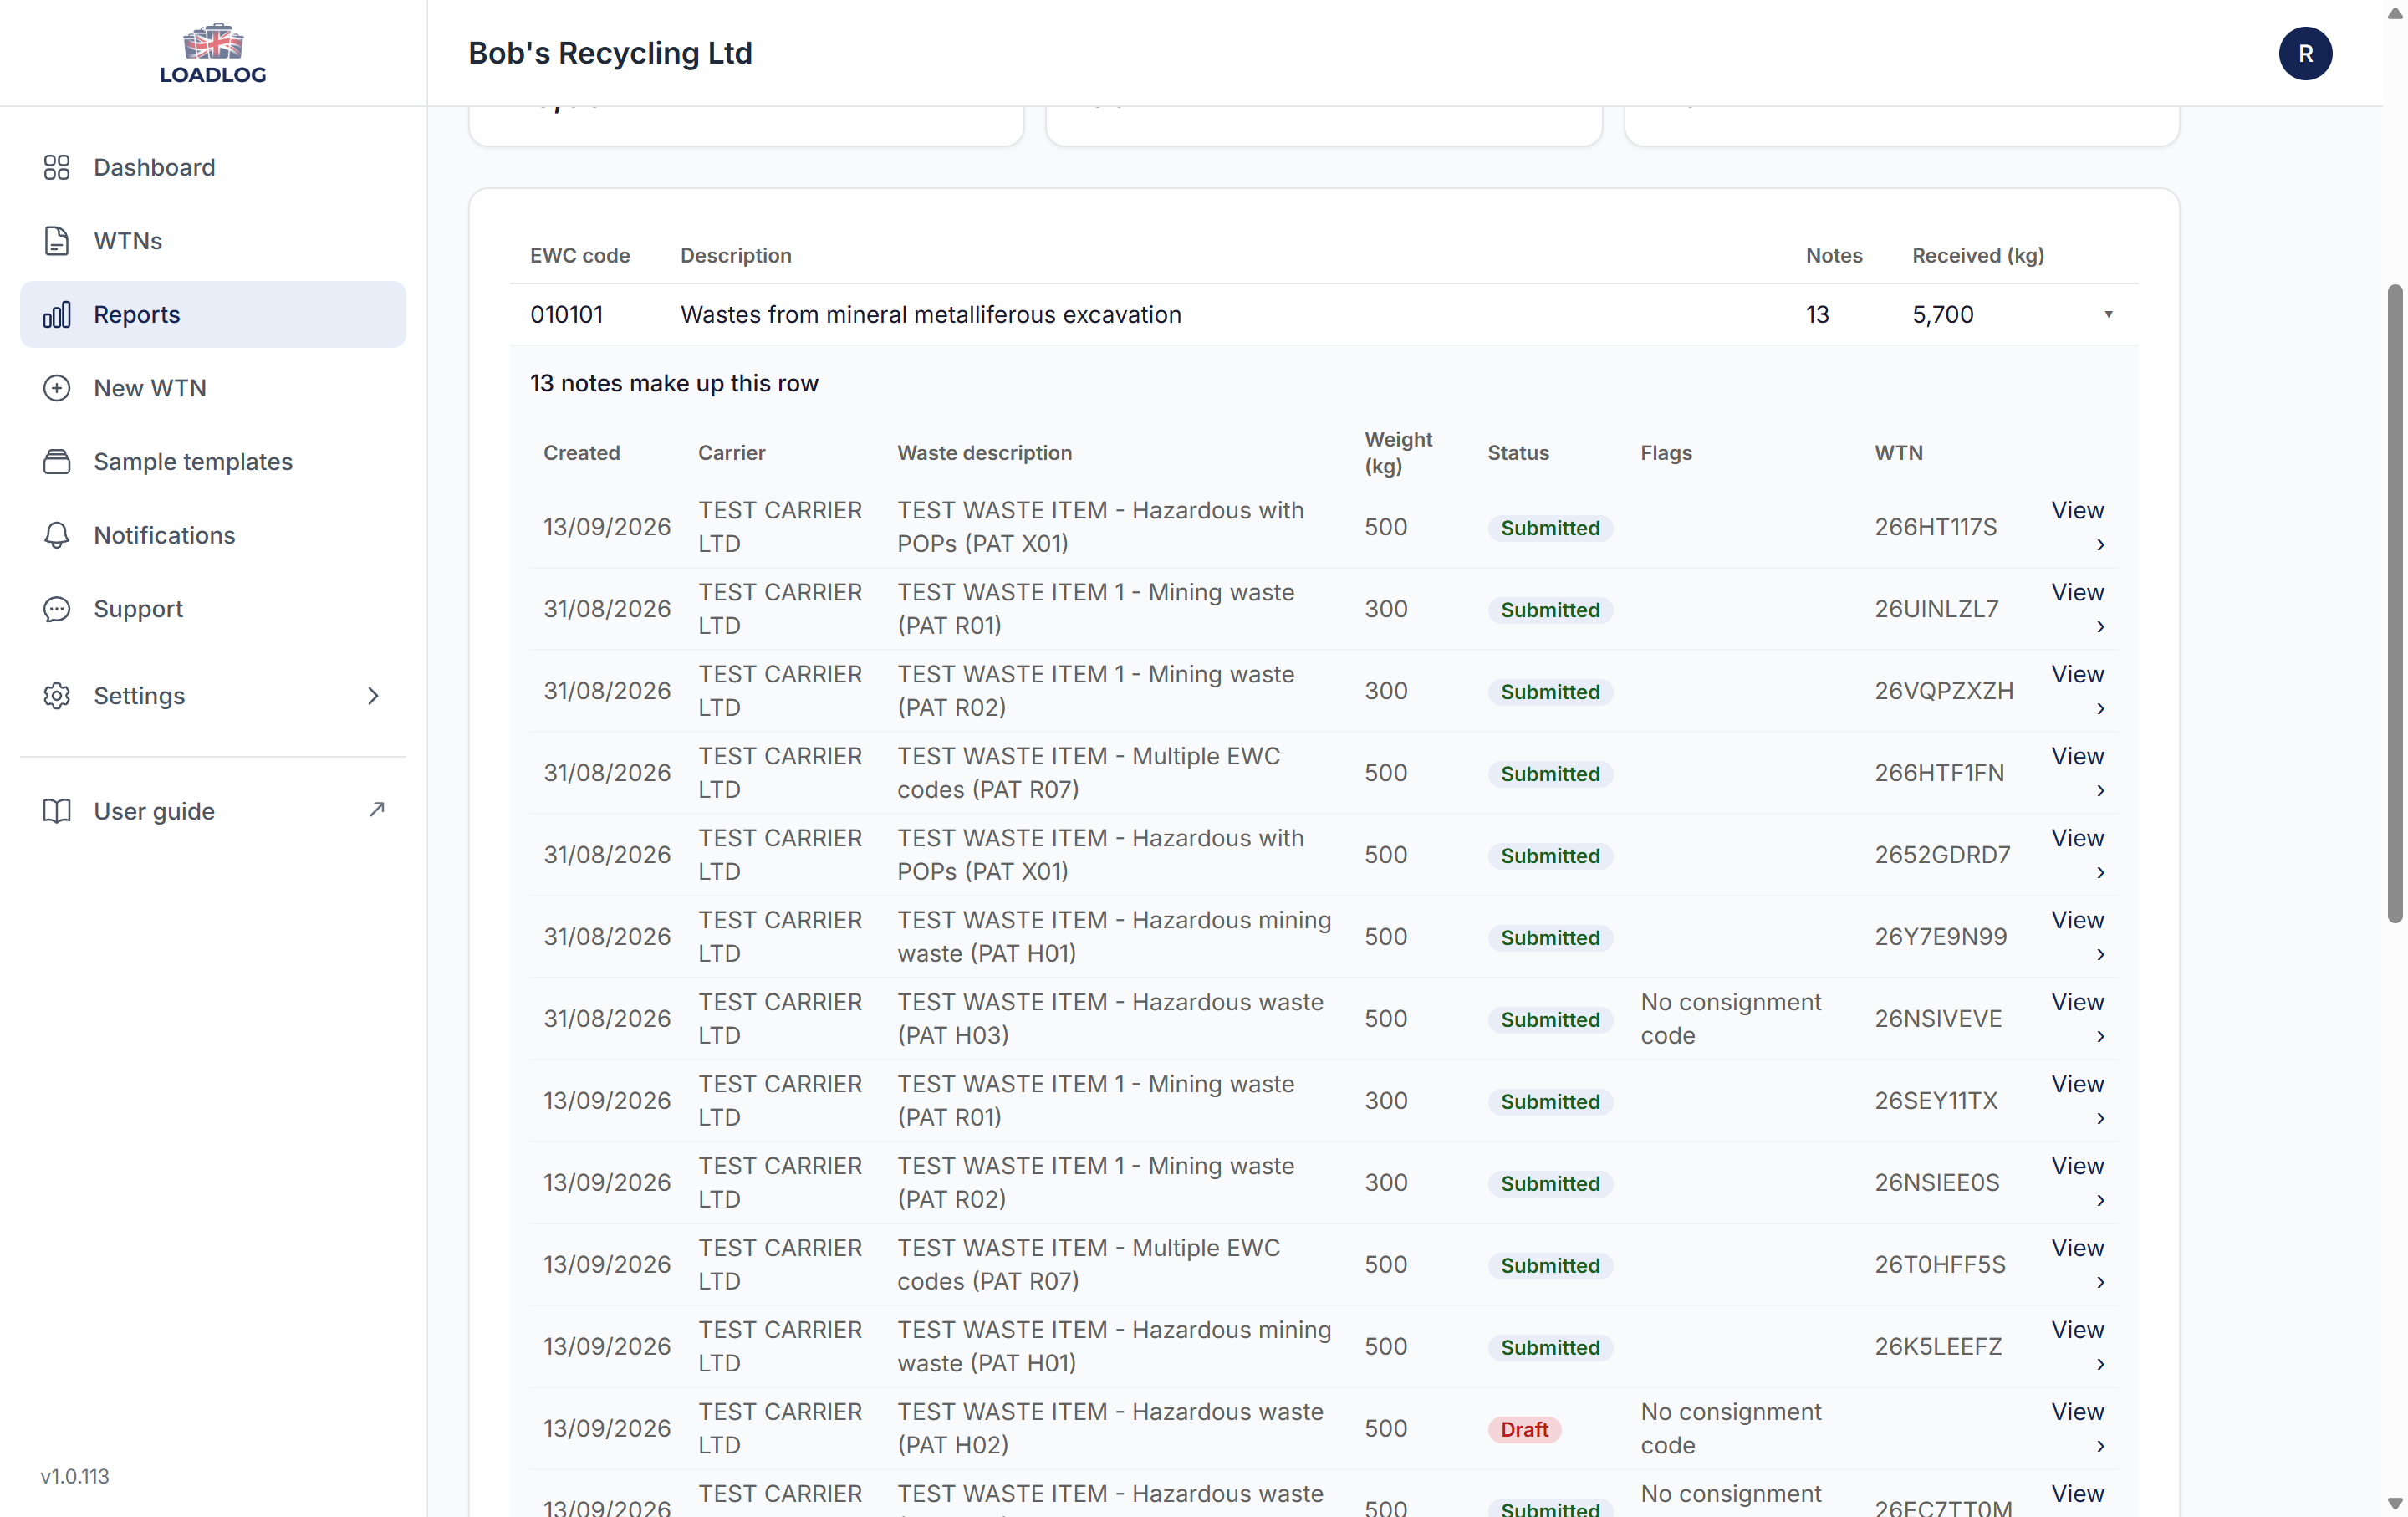
Every report downloads as a CSV file or as a formatted PDF. Downloads always cover the whole period you selected, not just the page on screen, so nothing is left out of what you file or hand over.
Reports are part of the paid plans. Compliance Lite includes the core reports for compliance work, and Compliance Plus and Enterprise include the full library. We add new reports over time, and they appear for you automatically. If you need something you cannot see, tell us from the Support page.
Every report that is run is recorded in your audit log, with who ran it and when, so there is a record of which reports have been pulled, by whom, and when.
5.2 View and search your notes
Open the WTNs list to see every note. You can search by EWC code, carrier or description, and filter by status, environment and date range.

5.3 PDF records
Every submitted note has a Download PDF button. Click it to download a PDF record with the waste details, signatures, timestamps and DEFRA reference number. Keep it for your records, hand it over at an inspection, or send it to anyone who needs a copy. There is an Email PDF button next to it, which emails the same record to your own email address.
5.4 Audit log
Open Settings, then Audit Log, for a complete record of activity on your account. You can filter by date range, action type and entity type.
Actions that are logged include sign-ins, note creation, submissions, PDF downloads, report generation, settings changes, user invites and role changes, and changes to your templates. Each entry shows the timestamp, the action, the user and any details such as the DEFRA reference.

5.5 Audit log CSV export
From the Audit Log, click Export CSV to download your audit log for compliance reporting. Use the filters first if you only want a specific date range or action type.
6. Support and notifications
There are two more places in the sidebar worth knowing about.
Support. Open Support to send us a message. You can attach up to five files (5 MB each), and tick Include browser details so we can see what you were working on when the problem happened.
Notifications. Open Notifications to see announcements about LoadLog, including new features and anything planned that affects your account.
7. Questions we get asked
The questions sites ask us most, answered in a few lines each. The rules themselves are covered in more detail on our compliance pages.
These answers are LoadLog's interpretation of DEFRA's published guidance. They are a starting point, not legal advice: where you are unsure, check with DEFRA or your national environment agency (the Environment Agency, NRW, SEPA or NIEA).
7.1 When do we have to start using it?
For a permitted or licensed site that receives waste, digital reporting starts in England and Wales on 1 October 2026, and in Northern Ireland and Scotland in January 2027. From your start date, every load you receive has to be recorded in DEFRA's service, and LoadLog sends that record for you when you submit the note. You can read the scope and the dates in DEFRA's guidance on GOV.UK.
7.2 Do we have to replace our weighbridge or our stock system?
No. LoadLog runs alongside what you already use. Type the weight in for each load, or import a CSV from your existing system if it can export one, and nothing on site has to change. Bulk entry and CSV import are on the paid plans; on Free you record notes one at a time.
7.3 Does it work on a phone or tablet in the yard?
Yes. LoadLog runs in a browser, so anyone on site can record a load from a phone or tablet, and there is nothing to install. It is the same account and the same notes on every device, so a note started in the yard is on the office computer when you get back.
7.4 My staff do not have email addresses. How do they get accounts?
Everyone signs in with an email address, and that is where the invite goes, so each person needs their own. Invite each one from Settings, then Team. If nobody has an address of their own, one shared mailbox is enough: with Gmail, for example, an address written as [email protected] arrives in the [email protected] inbox, so each person gets a sign-in of their own from the one account. Keep it one address per person, because two people sharing an address are one user to LoadLog, and the audit log cannot tell them apart.
7.5 Can staff have limited access?
Yes. There are three roles, and you pick one when you invite someone: Admin users manage settings and the team, Operator users record and sign notes, and Viewer users have read-only access. You can change a role later from the Team table in Settings. How many users you can add depends on your plan.
7.6 What if the driver has no carrier registration number?
LoadLog asks for a reason instead, and there are four to choose from: waste transferred on site, household waste transfer, one-off collection (unregistered carrier), or marine waste transfer. Pick the one that matches what happened, and the rest of the note carries on as normal. The reason is stored on the note and goes to DEFRA with it.
7.7 Which EWC code do I use?
Start with the lookup on the note: type part of a code, or a few words of the description, and it searches the waste catalogue for you. For end-of-life vehicles the code depends on the state of the vehicle: 16 01 04* for undepolluted vehicles, which are hazardous, and 16 01 06 for depolluted shells. The sample templates carry a ready-made example for most kinds of site, which you can copy and adjust. They are our interpretation rather than legal advice, so check the code against the waste in front of you.
7.8 How quickly must a note reach DEFRA, and does LoadLog remind me?
Within two working days, counting from the day after the load arrived and skipping weekends and bank holidays. LoadLog keeps every unsent note in your WTNs list with a Draft status, and the digest email (off until you switch it on under Settings, then Email Preferences) lists drafts that are still unsent after a day. There is no due-by date on a note yet, so those two working days are yours to watch. The timing is set out in DEFRA's guidance for sites that receive waste.
7.9 Can I fix a mistake after a note has been submitted?
If DEFRA refuses a note, LoadLog explains what to check and leaves the note editable, so you can put it right and send it again. The note also shows DEFRA's exact message if you need the detail. Once DEFRA has accepted a note the record is fixed in LoadLog, but it can still be corrected: open the note and click Correct this receipt, and LoadLog sends the change to DEFRA against the same waste tracking reference. DEFRA expects any error to be put right as soon as you can and within a month of finding it, so if you are unsure what to change, get in touch through the Support form.
7.10 What does an inspector get, and can I get our data out?
Every submitted note has a PDF record you can download or email, showing the waste details, the signature and the DEFRA reference, and the audit log exports to CSV for the date range you filter to. You also choose how long the audit log is kept: 6, 12, 18 or 24 months. For a visit, run the inspection pack from the Reports page: one download with the period's notes, tonnages and treatment, and an audit trail summary. Anything else an inspector asks for can be exported from the relevant report, or from the audit log.
7.11 There is a feature I would like, or something that is a pain. Can you help?
Please tell us. LoadLog is built by a small team, and feedback from sites like yours carries real weight, so we would much rather hear about the job that is a pain than leave you working around it. If a request comes up often enough to help other sites as well, we look at whether we can build it into the app. Send it over from Support, and the questions other sites ask us too end up on this page.
7.12 Can one note cover several vehicles?
Yes, when they arrive together: one delivery, one carrier, one vehicle bringing them in, and an item on the note for each car. Give each vehicle its own item so its weight, EWC code (16 01 04* for an undepolluted vehicle, 16 01 06 for a depolluted shell) and any POPs details stay with it. Loads arriving separately are separate notes, each due within two working days. For a day's vehicles, Bulk entry (section 2.11) is the quick way: pick your template, add a row per vehicle, and sign once.
7.13 We do not have a weighbridge. What do we record for the weight?
An estimate is fine. Enter your best figure and tick Weight is estimated on the item (Bulk entry has a Weight estimated column for the same thing). The flag travels to DEFRA with the submission, so estimated weights are normal submissions and you do not need a weighbridge. Where collection paperwork carries a standard weight per vehicle, use that.
7.14 When we buy from an auction like Copart, do we upload their form to DEFRA?
No. The form from the auction house is part of your purchase paperwork and carries on as it is; it is not the DEFRA record, and they are not submitting it for you at this stage. The DEFRA record is the receipt of the load at your site, and as the receiving site that record is yours: add each vehicle to LoadLog as it arrives and LoadLog submits it for you. The duty in this phase sits with receiving sites; carriers, brokers and dealers start in October 2027.
7.15 Which template should we use for vehicles we receive?
Start from the ready-made vehicle templates in the sample library: one for undepolluted vehicles (16 01 04*) and one for depolluted shells (16 01 06). Copy the one you need, adjust anything site-specific, and keep it as your own template; after that, a repeat entry is the template plus whatever changed. Section 2.10 covers templates, and the worked example in section 2.11 follows a vehicle breaker's morning.
7.16 We run more than one site. Can we use one login?
Yes. Add each site under Settings, then Sites: each keeps its own name, address and permit number, and every note and report carries the right site. One organisation, one login and one subscription covers them all. Multi-site is on Compliance Plus (up to 5 sites) and Enterprise (unlimited).
7.17 Do we still need our own DEFRA account if we use LoadLog?
Yes, one account per organisation, set up once. DEFRA ties the registration to your organisation, so you register your organisation with the service yourself and collect your API code (LoadLog points you to the GOV.UK registration form during setup). After that the day-to-day reporting is ours: every load you record is submitted to DEFRA for you, so you will not be logging loads into their service or uploading spreadsheets.
7.18 We tested in the sandbox and then went live. Can we still use those notes?
Yes. A note you sent to the sandbox stays as a test record, and it can become a production record at any time: open the note and click Resend to Production. LoadLog copies the details, including the arrival time and the signature, onto a new note ready for review and submission. The sandbox note keeps its own reference, and section 2.13 covers the rest.
7.19 We only carry waste and have no site. Can we use LoadLog?
Yes. Sign up as a Carrier. The carrier hub holds your permit or exemption, competence holder, drivers and their numbers, vehicles and documents. You do not connect to DEFRA yet: the duty to record and submit movements digitally is planned for October 2027, and section 3 covers the setup.
7.20 Do we need to register with DEFRA as a carrier now?
Not for the hub. Sites in England and Wales have had to record loads digitally since 1 October 2026. For carriers, brokers and dealers the duty is planned for October 2027, and the regulations for that phase have not been laid yet. The hub keeps the records that duty will need, and it works today without a DEFRA connection.
7.21 Which competence scheme do we choose?
Pick the one named on the certificate: CIWM (WAMITAB) operator competence, or CIWM Controllers and Transporters (CaT). If the certificate came from another route, choose Other and type its name. If you applied in the first year and the certificate has not arrived, tick In the first-year window: the record allows until 22 July 2028.
7.22 Can one account receive waste and carry it?
Yes. Choose Waste site and carrier at signup, or add the carrier side later in Settings, then Organisation. Your organisation details are shared, but the records are separate: the site's environmental permit number stays on the site, and the carrier registration goes in the carrier hub. Section 3.1 covers the switch.
7.23 How do we give a driver a number?
Open Carrier hub, then Drivers, and add the driver. LoadLog allocates the next number, or you can type one you already use. A number is never reused, even after a driver leaves. From 22 July 2027 every driver carrying waste needs a unique number, and must carry it with your permit or exemption number.